How to Blanch and Freeze Vegetables – A Handy Guide

A handy guide for how to blanch and freeze vegetables. If you have fresh veggies that you want to freeze for an extended time, here’s everything you need to know to preserve the fresh flavour, colour and texture of vegetables. This article and the attached guide provides all the answers you need to blanch and freeze vegetables.

stack of 5 bags of frozen veggies: squash, tomatoes, zucchini, peppers and broccoli
Storing frozen veggies in clear zip freezer bags makes checking your inventory quick at dinner time.

Download your Guide to Blanching and Freezing Fruits &Veggies

promo image of fanned out blanch and freeze veggies guide pages
How to Blanch and Freeze Fruits & Vegetables – A Handy Printable Guide.
Click to download your copy.

Is Blanching Necessary?

I know you’ve seen articles that say you don’t have to blanch vegetables to freeze them. Don’t trust that information. Sure you can stick anything in the freezer – but what will the taste, colour, texture and nutrients be like by the time you use those veggies? If you remember to use those veggies within a couple of weeks, fine, go ahead and freeze without blanching. BUT if you don’t keep track of when you froze those veggies and want good results months from now – blanch them!

Here’s the deal…

Vegetables contain enzymes that cause them to continue to age after they’ve been picked. That aging process slows down but does not stop in the freezer. So, sweet tender peas will, over time, turn starchy and bitter. Blanching or boiling your veggies for the recommended time (see guide below) stops those enzymes.

The aging process happens to all vegetables. For most vegetables flavor changes become noticeable after about 3 months in the freezer. If you know you will use your frozen vegetables within three months, freezing without blanching would work. I use this rule of thumb when freezing onions – I only freeze as much as I can use within 2-3 months.

Does fruit contain aging enzymes? Yes, it does but the effects are barely noticeable and therefore blanching is not required for fruits – yippee! See more on Freezing Fruit.

Good news…

Blanching is easy! It’s basically dipping vegetables in boiling water for a specified time and then cooling them quickly to stop them from becoming mushy. Timing matters, so follow the recommend times for different vegetables (see guide).

In this article I go through the step by step process of how to blanch and freeze vegetables. I also answer all the questions I’ve ever had in workshops that I’ve given on this topic. Keep reading and do it right!

Want the quick version?

Get the Guide for how to blanch and freeze vegetables. This three page reference guide provides a snapshot of the key information you need to know including the full process, blanching times, tips to avoid freezer burn and even a run down on how to freeze fruits. Just hit the button below and get it in your inbox right away. It’s great for hanging in your cupboard or tucking into your favourite recipe book for quick, easy reference.

Grab your FREE guide to blanching & freezing

How To Prepare Vegetables for Freezing

  • Choose fresh, ripe, seasonal vegetables as close to harvest as possible. This will help you lock in the best flavour, colour and nutrients.
  • Pick the best veggies to freeze. Eat broken, torn or odd bits right away.
  • Wash veggies well and trim away any blemishes.
  • Peeling is optional. Do what you would normally do when preparing vegetables. For example, I leave the peel on carrots, but peel squash, sweet potatoes and tomatoes. Tomato peels will separate from tomatoes once thawed and they don’t break down very easily in cooking. If their texture doesn’t bother you – leave them on, if you prefer not to have tomato peels in your sauce, blanch and peel them first. (See more details in my article on Preparing and Canning Tomatoes).
  • Think about how you typically use vegetables. What shape and size do you prefer, eg. round carrots or carrot strips? How much do you typically use at one time, eg. 2 cups, 4 cups, etc. This will help you determine how to cut your vegetables and what size of container to freeze them in.
  • Cut your vegetables based on the above. Just keep the size consistent for each batch that you’re blanching.
  • Unlike most fruits, vegetables do not need to be soaked in lemon juice. (Avocado does, but it’s technically a fruit).
hands holding whole raw carrots under running water
Wash raw veggies well, (carrots shown above), and trim away any blemishes before blanching.

10 Easy Steps to Blanch & Freeze Vegetables

  1. Wash drain, sort and cut vegetables in the size and shape you prefer. Peeling is optional.
  2. Bring a large pot full of water to boil. Aim for about 4 cups of water for every cup of vegetables. The high ratio of water to veggies helps bring the pot back to a full boil quickly, without over cooking your veggies.
  3. Add veggies and return water to a full boil – big bubbles breaking the surface of the water continually.
  4. Boil for time indicated on the Blanching Guide and as recommended by the National Center for Home Food Preservation. The time varies with each vegetable and how small it’s cut. For example corn kernels only need to be blanched for 4 minutes while whole corn on the cob takes 7 minutes. Follow the guide!
  5. Shock veggies in an ice water bath or really super cold water to stop cooking process. A good rule of thumb is to leave the vegetables in the cold water for as long as you boiled them.
  6. Drain and pat dry to remove as much surface water as possible. Excess water will lead to ice formation and reduce the quality of your frozen vegetables. Use a salad spinner or clean towel to remove as much water as possible.
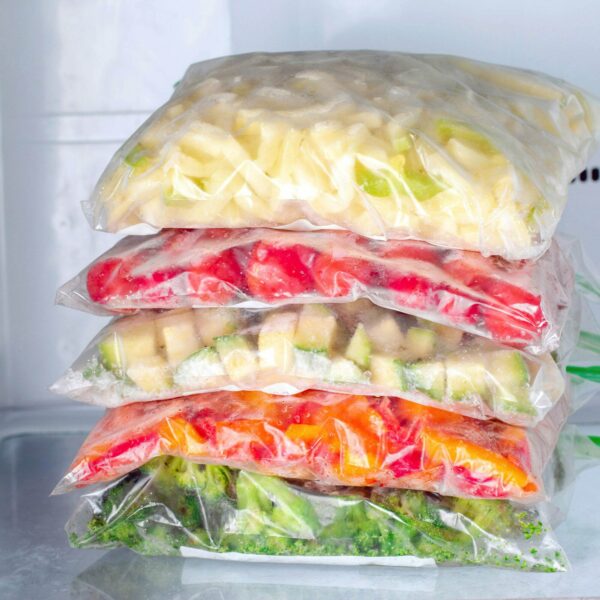
  7. Freeze based on how you will most likely use your frozen vegetables. For free flowing vegetables like peas or corn, flash freeze vegetables on a baking sheet (see FAQ). For dark leafy greens like spinach, kale, collards or chard try freezing in an ice cube tray for the perfect pucks to add to soups, etc. Or simply place in a container that’s sized well for how you plan to use the vegetables.
  8. Place in freezer container. If using freezer bags, squeeze out as much air as possible. If you have one, a vacuum sealer is great, but it’s not necessary. To remove extra air, use a straw tucked in one corner to suck out extra air. If using a rigid container, leave 1/2 inch headspace to allow for expansion.
  9. Label containers and freeze. Include dates to help you keep track of which food should be eaten first.
  10. Use within one year for best quality. Frozen vegetables are safe to eat well past a year, but the quality will deteriorate quickly after a year.
dark green and frozen blocks of kale, made using ice cube trays
Freezing greens like kale in ice cube trays and then placing in a freezer bag is convenient for adding a few greens to soups, stews, curries or casseroles

Frequently
Asked
Questions

Have a question that isn’t covered? Let me know in the comments below and I’ll be happy to answer.

I want you to have the best tasting frozen veggies all year long.

Here are a few more tips to help.

Do not add salt or seasoning when blanching or freezing, add them when using the vegetables in a recipe.

Air & Moisture are the biggest enemies of frozen food. Do what you can to prevent these two elements from reaching food for best quality, long lasting food.

If using glass jars in the freezer, use heavy tempered glass that can handle a little jostling. Wide neck jars that have straight sides (no rounded shoulder near the top) are best. And always leave 1 inch head space to allow for expansion.

According to the Ntl Ctr for Home Food Preservation, it is safe to re-freeze thawed food – just expect quality to deteriorate.

The quicker food freezes, the fewer ice crystals which improves long term quality. Choosing smaller containers helps freeze food more quickly and makes frozen vegetables easier to use.

blanching pot with sieve
Use 4 cups water for every cup of veggies you want to blanch. A big pot with lots of water will get veggies boiling quickly.

Blanching is briefly putting vegetables in boiling water and then quickly immersing them in ice cold water to immediately stop further cooking. Usually, the hot immersion is less than 5 minutes, but varies depending on the size and type of vegetable. The exact times have been scientifically tested to ensure they stop the enzymes in a particular vegetable while not over-cooking it. For times see the Guide to How to Blanch & Freeze Vegetables Guide

Blanching preserves flavour, colour, texture and nutrients when freezing vegetables by stopping the aging enzyme present in all vegetables. The aging enzymes cause vegetables to continue to age after they’re harvested. The aging process does not stop in cold temperatures – even freezing temperatures. To stop the enzymes you need to blanch veggies before freezing. Luckily, blanching is super easy to do.

Blanching also removes surface dirt and microorganisms.

And a final bonus of blanching is that blanched vegetables cook faster once you’re ready to use them.

Vegetables that have not been blanched are safe, but they will lose quality in texture, taste and colour. This loss becomes most noticeable after a few months in the freezer. Unless you use your frozen vegetables soon after processing and can remember when they were processed, blanching is your best option.

I am passionate about blanching vegetables before freezing because I once fell for the lure of internet sites telling me that I didn’t need to blanch my veggies. But only once. I was so disappointed when I had to toss out my beautiful tender sweet garden peas because they tasted old and starchy. I should have trusted the science I studied as a Professional Home Economist. Don’t get suckered like I did, your veggies deserve to be frozen properly.

A little, yes. Anytime you boil vegetables or put them in water, there will be some loss of water soluble vitamins. In most vegetables that means some loss of Vitamin B and Vitamin C. On the other hand, fat-soluble vitamins like Vitamin A and K become a little more concentrated. Does this mean you shouldn’t freeze or blanch vegetables – no! It means you should eat a variety of vegetables, some raw and some cooked. If you have a well balanced diet, this minimal loss of nutrients is nothing to worry about.

The amount of time required to blanch vegetables differs depending on the type of vegetable, the size of the vegetable and how it’s cut. As always, I rely on the National Center for Home Food Preservation for information. As far as I know, they’re the only ones actually testing these techniques. My handy Blanching Guide is based on their recommendations.

Follow the handy chart in the Download. It’s totally worth it!

Those aging enzymes are tricky! If you underblanch or boil for less than the time recommended, you actually stimulate the enzymes so they age vegetables quicker than normal. That’s why waiting for the water to return to a full boil and boiling for the amount of time indicated is important.

Overblanching will completely deactivate the enzymes, but it may cause your veggies to get too soft. This will be even more noticeable when you cook your frozen vegetables. No one wants mushy vegetables, that’s why the times indicated in the list are the shortest blanching time.

Yes, there are a few veggies that you can freeze without blanching.

  • onions
  • shredded zucchini
  • sweet peppers
  • hot peppers
  • mushrooms
  • celery
  • squash

I do not blanch these vegetables because of how I use them. These frozen veggies are never a major dish on their own, unlike frozen peas or corn. They are used as a foundation or as a supporting ingredient in soups, curries, chilis, casseroles or other mixed dishes so their individual flavour and texture plays a minor role. Also, peppers and zucchini are biologically fruit, so they can be preserved more like fruit than vegetables.

My blanching chart highlights these veggies and provides the recommended blanching time by the National Center for Home Food Preservation so you can decide for yourself if you want to blanch these veggies or not.

bagged shredded zucchini
Freeze shredded zucchini and store in freezer bag for use in baked recipes.

The most popular vegetables to freeze are corn, carrots, peas, broccoli, cauliflower, green beans, winter squash and dark leafy greens.

frozen veggies in bowls
Popular veggies to freeze.

You can also freeze sweet or hot peppers, onions, zucchini, cabbage, mushrooms and celery. These vegetables have a higher water content so their texture will change quite a bit when frozen – whether you blanch them or not. Frozen zucchini might not be a great side dish, but it’s fabulous in Chocolate Zucchini Loaf.

Don’t even bother freezing high moisture vegetables like lettuce or cucumbers.

Yes and no.

Boiling kills most bacteria. But, because blanching is not a very long boil, not all bacteria or their spores may be destroyed. Some bacteria need to be kept at 165°F/74°C for 10 minutes or more to be destroyed.

No. It does “freeze” or stop bacteria, mold and yeast from actively growing, but it does not kill them. Once food is thawed, those microbes become active again. Freezing only suspends their activity. If you blanch before freezing, you will kill most bacteria.

Yes, you can. If you want to make your own medley of frozen vegetables here are two ways you can do so:

  1. Blanch and Freeze Together – If your vegetables are approximately the same size and require the same blanching time as indicated in the chart, you can blanch and freeze them together.
  2. Blanch and Freeze Separately then Combine – If the vegetables have different blanching times, blanch them separately and then pack them together in freezer containers.

I usually do not freeze vegetables together because I like the flexibility to pick and choose which vegetable to add to a dish. Also, I freeze vegetables when they’re in season and my favourite combination of peas, carrots and corn are never ripe at the same time.

frozen mixed veggies
Freeze veggies together if you know you’ll LOVE to eat them together EVERY time and they have the same blanching times. To keep your options open, freeze veggies separately.

In home kitchens, flash freezing is when we spread vegetables in a single layer on a large tray to quickly freeze them as individual vegetables. This prevents vegetables from sticking together in one large clump and, because they freeze more quickly, there will be fewer and smaller ice crystals. After about an hour of “flash freezing” vegetables are put in an airtight container for long term storage.

flash freezing corn
Flash freezing corn at home so it freezes quickly and I can easily pour out just what I need without it being all stuck together.

Commercially, flash freezing is a much more intense process. Fresh produce is frozen very quickly at extremely cold temperatures by submersing the vegetables in liquid nitrogen. The result is instant frozen veggies with minimal ice crystals.

Your frozen vegetables will be safe to eat as long as they stay frozen at a consistent -18°C/0°F. But for best flavour, rotate through your frozen vegetables regularly and use within 6-12 months. Don’t hoard them, eat them!

  • Use freezer grade containers that are moisture-vapor resistant, durable and easy to seal.
  • Use correct size of containers that fit food snuggly and avoid having extra air space.
  • Freeze in small portions.
  • Provide sufficient headspace to allow for expansion if food contains liquid and you’re using glass or plastic containers.
  • Options include:
    • Rigid containers – plastic, tempered glass, aluminum
    • Flexible containers – silicone bags, freezer bags, freezer wrap, freezer paper or foil
    • Ice cube trays – for small servings
  • Label packages – food, date, quantity and any other info to help you use your food efficiently

Reusing plastic containers (yogurt or margarine tubs) is a great way to practice sustainability in the kitchen. They may not be as airtight as other containers, so use these for foods you’ll eat within a few weeks. And remember, label well so you remember what’s in them!

No. Just use well cleaned, airtight containers.

  • Freezer burn is a food quality, not food safety issue.
  • Occurs when moisture moves from food and refreezes on the inside of the package, leaving food with dry patches and a package full of ice crystals.
  • Dry, grayish-brown spots on food are known as freezer burn and typically are accompanied by ice crystals in the frozen food package.
  • Caused by excess moisture, exposure to air and/or frequent temperature fluctuations.

See below for tips on how to prevent freezer burn.

After all the work you put into freezing your vegetables, they deserve to be cooked with care. Avoid mushy frozen vegetables, click to read my tips for cooking frozen vegetables.

How to Prevent Freezer Burn and Ice Crystals

  • Use freezer grade containers/packaging that are the correct size. Vegetables should fit snuggly into the container with as little airspace as possible.
  • Remove as much air as possible from packaging when freezing and after each use.
  • Remove as much moisture from food as possible before freezing. After blanching or washing, drain and dry with clean towel or salad spinner.
  • Close freezers quickly when using.
  • Ensure freezer stays at the correct temperature 0°F (-18°C).
  • Freeze food in small quantities to promote quicker freezing. Quicker freezing equals smaller and fewer ice crystals which leads to less freezer burn and ice build up. Also, smaller packages thaw quicker and don’t require fussing with an airtight seal when returning the unused frozen vegetables back into the freezer.
colourful image including bags of frozen peas, beets, carrots, yellow beans and squash in zip bags in a freezer drawer
Blanching and freezing fresh, in-season vegetables means you can enjoy the taste of summer all year long.

How to Freeze My Favourite Vegetables

For detailed instructions and photos of how to freeze specific vegetables click on the bar below.

Well, there you have it! A complete run down of how to blanch and freeze vegetables. If you have any questions I haven’t addressed, let me know in the comments below. I’ll add it to the list so others can benefit too.

And if you find this information and the handy guide helpful, share your feedback or post a photo on Instagram @GetGettyS or on Facebook @GettyStewart.HomeEconomist.

Original post from 2016, updated with more info in 2022.

4 Comments

  1. When I left the garlic in the ground too long, I had to use it quickly. I peeled and roasted with olive oil, a complete cookie sheet. Put it into the magic bullet (in batches) with enough olive oil to make paste. Placed tablespoons of the paste on wax paper and froze. Wrapped each ball in cling film, and had bags of roasted garlic for mashed potatoes, garlic bread, stir-fries, etc.

  2. Hello! I’m trying to do some prep for Thanksgiving and was going to dice sweet potatoes blanch and freeze them until ready to cook to get some of the prep done. Your chart(which is awesome btw) says to cook them completely how will this change my making the dishon the day? Thank you!

    1. Hi Evelyn,
      Good for you for getting a good start on things.
      What are you planning to do with the sweet potatoes on Tday? Have you considered pre-making the entire sweet potato dish and freezing that? If you’re planning a mashed dish or casserole of some kind, perhaps you can prep it entirely, seal it well and freeze so it’s ready to pop in the oven. You’d have to thaw it in the fridge overnight. You could even finish baking the dish and then reheat it in the microwave if oven space is going to be hard to come by. Reheating in a crock pot may also be an option.

      Good luck and have a Happy Thanksgiving!

      Getty

Leave a Reply

Your email address will not be published. Required fields are marked *

This site uses Akismet to reduce spam. Learn how your comment data is processed.