How to Make Classic Homemade Pumpkin Pie
Homemade pumpkin pie is easier than you think! All you need is a delicious recipe with easy to follow instructions and plenty of helpful tips along the way. Just so happens it’s all right here!

Also Read: How to Make Pumpkin Puree, Pumpkin & Spice Pudding with Gingersnaps, Pumpkin Chocolate Chip Cake
Check out this Table of Contents to help you navigate to the tips and info you’ll find most helpful. Just click the topic you want.

Helpful Tips for Homemade Pumpkin Pie
After years of making pies, teaching pie workshops and answering questions, here are my top tips for homemade pumpkin pie.
Relax! People adore homemade pies and appreciate the thought and effort you put into making it for them. They don’t expect perfection, they just want a tasty pie with a charming, rustic, handmade look. Unless of course you’ve been baking pie weekly for 15 years or own a pie business – then they expect pie perfection! 😘
Flavour Tips
- Use store bought pie crust as a convenient shortcut. It’s quick and easy to work with and nobody needs to know!
- Make your own filling, it’s absolutely worth it! Canned pie fillings (pumpkin pie or fruit fillings) are pre-sweetened, flavoured and coloured often with added preservatives and thickeners. They’re easy, but they lack depth of flavour. A homemade filling makes all the difference.
- Pumpkin puree from a can is an easy, tasty way to make your homemade pumpkin pie filling. If you’re a keener, make your own pumpkin puree, but 100% pumpkin puree (NOT pumpkin pie filling) is an easy shortcut that won’t compromise your homemade pie filling.
- You can use kabocha, red kuri, butternut, hubbard, buttercup squash or even sweet potato puree instead of or mixed in with pumpkin puree for your pumpkin pie filling. These squash taste amazing in pie.
- Use a pie spice you love and be generous with it in your filling. If you want, make your own pie spice.
Pastry Tips
- Temperature matters. Follow any instructions related to temperature for best results. For example keep the pastry ingredients chilled, let the pastry chill before rolling, preheat the oven, bake the pie at the recommended temperature and cool gradually.
- Par-baking the pie shell helps ensure a well cooked, non-soggy or gummy crust. But, if you and your guests aren’t that particular, you can get away with not par-baking (shh don’t tell the pie experts I said that!).
- Use a graham cracker crumb crust if you want to avoid pastry completely – better yet try using crushed ginger snap cookies for your crumbs!
- For a gluten free pie look for GF graham crackers or gingersnaps to make a crumb crust.
- To avoid cracks follow the tips below, but if they happen just cover them with whipped cream or pastry cut outs.
- Brush an egg wash (1Tbsp milk/cream with a lightly beaten egg) on your pastry for a beautiful golden coloured pastry. Sprinkle with coarse sugar for even more texture and flavour.
- Make your pumpkin pie up to 3 or 4 days ahead of time and keep in the fridge. This helps avoid any last minute stress or pressure if you’re making a fancy dinner.
- You can freeze pie (see below) raw or baked. Which is better? I prefer the fully baked version – it’s easier to freeze and thaws beautifully – just follow the advice below.

Ingredients for Pumpkin Pie
Here’s what you’re going to need to make this recipe:
Pie Crust Ingredients
Buy your favourite crust or follow the instructions below for my homemade pie crust. If you want to make the pie crust cutouts to decorate your pie, be sure to get a double crust. You’ll roll out one for the bottom and one for the cut outs.
My homemade pie crust is made with:
- flour
- shortening
- butter
- sugar
- salt
Pumpkin Pie Filling Ingredients
Make your own filling – avoid pumpkin pie filling from a can. The filling is SUPER easy to make and it truly makes a difference to the quality of your pie. My homemade pumpkin pie filling includes:
- Pumpkin Puree (homemade or store bought)
- Pie Spice (cinnamon, ginger, nutmeg, cloves)
- Evaporated Milk
- Eggs
- Brown Sugar
- Salt
What’s the Difference Between Canned Pumpkin and Canned Pumpkin Pie Filling?
Canned pumpkin pie filling is pumpkin puree mixed with sugar, spices and added flavours and/or colours. Canned Pumpkin Puree is just pumpkin – no extras. I highly recommend you make your own pie filling using 100% pumpkin puree.
PRO TIP – Always read the ingredient label when buying canned pumpkin to know what you’re getting.
GLUTEN ALERT – Some pumpkin pie filling or pie spice may include wheat flour – always read the label!

How to Tell When Pumpkin Pie is Done
Experience is your friend when it comes to judging if a pumpkin pie is ready to come out of the oven. If you’re just learning – you’re going to have to “trust the process”. You will think to yourself “there’s no way this pie is done, it’s still jiggly in the middle”. But that’s when it’s ready to pull out of the oven – when the center is jiggly like a bowl of Jello not watery or slushy. Trust that it will finish cooking and firming up on the counter. It will.
Here’s what to look for:
- the edges of the pie crust should be browned and look well baked
- the filling around the outer 1-2 inches should be puffed up and firmly baked with less shine to them
- the filling in the middle, about a 3-4 inches wide area, will be soft and jiggly, slightly glossy and sunken compared to the puffed up outer edge
Take that pie out at this stage and let it cool – slowly at room temperature.

Preventing Cracks & What to Do if They Happen
Luckily, cracks don’t affect flavour, so it’s not the worst thing that can happen. But I get it, we’d all be happier if cracks didn’t happen! Here are my tips for preventing cracks – but seriously, cracks are easily covered with whipped cream or pastry cut outs – so don’t stress about them!
Cracks happen because as the eggs in the filling cook, the egg proteins shrink and tighten up, the more it cooks, the more it pulls and eventually shows up as cracks in your pie. Sometimes, the cracks form after the pie is out of the oven – that’s because the pie continues to cook a little when it’s out of the oven.
- Do not overcook your pie. It’s done when the edges are set but the middle is till a little jiggly. Remember, the insides continue to cook a little when it comes out of the oven and the filling become firm up as it cools.
- Use the correct oven temperature. If you’re not sure your oven runs at the right temp, use an oven thermometer to keep an eye on it.
- Make sure your oven is fully preheated. Again, this helps ensure the pie doesn’t stay in the oven longer than it has to.
- Bake on the lower rack in your oven. This makes sure your crust is well baked without having to overcook the filling.
- Cool gradually at room temperature. Shocking your pie with the cool temps of a windowsill, cool porch or fridge can cause cracks.
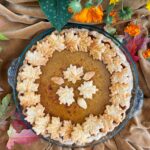
How to Decorate Pumpkin Pie
- use a tablespoon and place free-form dollops of whipped cream on the pie and top with a sprinkling of cinnamon
- use a piping bag to spritz on whipped cream
- use pie crust cut outs (bake them separately from the pie to prevent over baking them)
- use whole or halved ginger snap cookies or other decorative cookies
- use ginger snap or graham cracker cookie crumbs to sprinkle on top
- use candied pecans to create decorative patterns on top of the pie
How to Store Pumpkin Pie
Baked pumpkin pie can be safely stored in the fridge for up to 4 days. Thanks to that delicious filling with dairy and egg, keep it in the fridge.
How to Freeze & Reheat Pumpkin Pie
Good news, you can freeze pumpkin pie! So, while you have all the ingredients out, why not make 2 or 3 or 4 pies and tuck them in the freezer? You can freeze pumpkin pie raw or fully baked. That means any leftover pieces of pie (HA!) can be frozen too! If you want, you could also freeze the pumpkin pie filling and the pie pastry separately.
How to Freeze Raw Pumpkin Pie
- Use a metal or aluminum pie plate so there’s no risk of glass or ceramic shattering when transferring your pie from the cold freezer to the hot oven.
- Prepare the pumpkin pie as shown in the recipe. Par-bake the crust, let cool and fill with filling.
- Instead of baking, cover the pie with plastic wrap and carefully transfer to a flat surface in the freezer. Let it freeze solid then place in airtight plastic bag.
- Label and include baking instructions.
- Use within 1-2 months for best results.
Baking Raw Frozen Pumpkin Pie
- Preheat oven to 400°F (204°C).
- Remove pie from freezer, unwrap and place directly in oven.
- Bake at 400°F (204°C) for 15 min. Reduce heat to 350°F (180°C) and bake for 60 to 90 minutes. Yup, it takes an extra 30 minutes or more to bake a fully frozen pumpkin pie.
How to Freeze Baked Pumpkin Pie
- Bake pie as instructed in the recipe.
- Let cool completely on a wire rack. Remember any warmth will cause condensation which will create unwanted ice crystals.
- Wrap the pie in two layers of plastic wrap to ensure a tight seal. Top with a final layer of aluminum foil or place in extra large, air tight freezer bag.
- Freeze on a flat surface.
- Use within 1-2 months for best results.
Thawing Frozen Baked Pumpkin Pie
- Give yourself plenty of time, it’ll take 12-18 hours to thaw your pie in the fridge.
- DO NOT thaw pumpkin pie at room temperature, in the microwave or an oven turned on low. Moving a custard pie from freezing to room temperature or warmer will cause it to weep. The liquid that separates from the filling will cause a soggy crust. Just thaw slowly in the fridge.
- Once thawed, decorate with pastry cut outs or whip cream and enjoy.
Getty’s Classic Homemade Pumpkin Pie Recipe
Classic Homemade Pumpkin Pie Recipe
Ingredients
- 1 double crust pie (one for shell, one for decor) see recipe below
- 1 3/4 cups pumpkin or squash puree homemade or canned
- 2 eggs lightly beaten
- 1 1/2 cup evaporated milk 354 ml/12 oz
- 3/4 cup brown sugar
- 3 tsp pie spice
- 1/2 tsp salt
Instructions
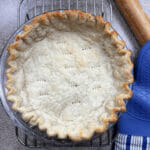
- Par-bake the pie shell to prevent a soggy crust.
- Preheat oven to 400°F (204°C).
- Roll 1 chilled pie disc to a 12” diameter circle or two inches wider than upside down pie pan. Transfer to a 9” pie pan. Tuck overhanging dough underneath the edge and crimp.
- Line the shell with parchment paper and fill with dried beans (or pie weights). Bake for 12-15 minutes at 400°F (204°C) or until edges start browning. Remove parchment and beans, prick bottom with fork and bake another 8-10 minutes until bottom looks dry and is starting to brown. Cool for at least 1 hour before adding the filling.
- Keep oven preheated to 400°F (204°C). In large bowl, mix together the pumpkin or squash puree, eggs, brown sugar, pie spice and salt until well combined.
- Pour filling into par-baked pie shell, leave 1-2 cm space between top of filling and top of pie shell. Place in lower part of oven and bake at 400°F (204°C) for 15 min. Reduce heat to 350°F (180°C) and bake for 35 to 40 min. This allows for more even baking and less chance of cracking. If edges are browning too much, loosely cover pie with aluminum foil or use a pie crust shield to cover the edges.
- Bake the pie until the edges are firm and puffy but the center 3-4 inches is still somewhat jiggly (not sloshy). Don't overbake, the filling will continue to bake and become firm when removed from oven.
- Place pie on cooling rack and let cool for at least 3 hours at room temperature.
- Garnish and serve.
Video
Notes
Nutrition Facts (per serving)
Getty’s Homemade Pie Pastry
Pie Pastry Recipe
Ingredients
- 2 1/2 cups all-purpose flour
- 1/2 tsp salt
- 1 Tbsp granulated sugar
- 1/3 cup cold butter cubed
- 1/2 cup shortening cubed
- 1 Tbsp vinegar
- 6-8 Tbsp ice cold water
Instructions
- In large, chilled bowl, mix flour, salt and sugar.
- Cut in butter and shortening until crumbly with peas size bits of butter still left. Use a pastry cutter, two knives or your hands.
- Mix vinegar with 1 cup of water and ice. From this, measure 6 Tbsp of water and pour over flour. Mix with fork just until ingredients come together. Add more water as needed to roughly bring dough together. Add a little at a time to avoid making dough too sticky or wet.
- Turn onto a lightly floured surface and shape into a ball while being careful not to work the dough too much. Cut the ball into equal halves and lay each on a large piece of plastic wrap. Wrap the halves with plastic wrap and squish to make flat, round discs. Refrigerate for 1 hour or longer.
- Keep dough in fridge for up to 3 days or wrap and freeze well for up to 6 months.
Notes
Nutrition Facts (per serving)

Pie Pastry Cut Outs
Use the pie pastry recipe from above to make these cute pie pastry cutouts. Bake them separately and add them on top of the pie after the pie comes out of the oven. You’ll have better control and avoid burned cut outs.

How to Make Pastry Cut Outs
- Roll pastry to an even thickness about 6-7mm or 1/4″.
- Pick your favourite cookie cutters. You can use imprint cookie cutters, like in the photo above, but remember that the pastry will puff up and distort fine details.
- Dip the cookie cutter lightly into flour and cut out your favourite shapes.
- Brush cut outs with egg wash (1 beaten egg mixed with 1 Tbsp cream or milk) for a shiny brown crust.
- Sprinkle generously with sugar, coarse sugar gives a crystal like finish, but any sugar will do.
- Place cut outs on a lined baking sheet and bake for 8-10 minutes until lightly browned at 350°F (180°C).
- Move to cooling rack and let cool before placing on pie.

Pastry PRO TIPS
- Make cut outs ahead of time and freeze until ready to use.
- Use these cut outs as tasty, pretty little decorations on guests’ dinner plates.
What tip for making homemade pumpkin pie did you find most useful? Will you make your pie entirely from scratch or use some convenient shortcuts? I’d love to hear about your experience and see your photos! Please share your photo and tag #getgettys so I can see it and like it!