How to Make Pavlova with Mixed Berries
Have you ever tried pavlova? This sweet airy dessert is made with whipped egg whites that are baked on low heat for a crispy exterior and marshmallow-like interior. Topped with whipped cream, lemon curd, and fruit, it’s the perfect dessert for any occasion. I think you’re going to love this delicious Pavlova recipe along with helpful tips and answers to common questions.
Also Read: Homemade Lemon Curd, Blueberry Sauce, How to Freeze Eggs, How to Make Whipped Cream
Key Ingredients for Pavlova

Egg Whites
Egg whites are the star of the show. Their ability to foam up and trap air is what gives pavlova its light, airy structure and marshmallowy inside. For the best results:
- Use fresh eggs or high-quality liquid egg whites. You can still use older eggs or pasteurized egg whites but they will take longer to whip up, will not whip as high and may not be quite as stable.
- Make sure your mixing bowl and beaters are clean and grease-free. Even a hint of fat will prevent egg whites from whipping successfully.
- Bring the egg whites to room temperature before whipping—they’ll whip up much more easily.
- Generally speaking, when planning your dessert, use 1 egg white for 1 to 2 people to ensure each person gets a generous portion of meringue.
Sugar
Sugar is essential for both sweetness and structure. As you gradually beat it into the egg whites, it dissolves and creates the glossy, stiff peaks that are crucial for a stable meringue. For a perfectly smooth pavlova:
- Ensure your granulated sugar is lump free. For extra luscious results, use superfine or caster sugar which dissolves faster than granulated sugar. Make it yourself by putting granulated sugar in a food processor (I rarely do this).
- Add it slowly, one spoonful at a time, to avoid deflating the egg whites.
- The lowest amount of sugar I recommend is 1/4 cup sugar per egg white.
Cornstarch
Cornstarch is the secret ingredient that gives pavlova its unique marshmallowy center. The marshmallow center is the difference between a meringue and a pavlova. Cornstarch helps stabilize the egg whites and prevents it from weeping (getting watery) during baking. Use 1/4 tsp cornstarch per egg white.

Cream of Tartar or Vinegar
A little acid, like cream of tartar or vinegar, strengthens the egg whites and keeps them from collapsing. It also helps maintain the pavlova’s structure as it bakes. You’ll only need about 1/8 tsp per 1 egg white or 1/4 tsp per pasteurized egg white. Personally I like using cream of tartar, but white vinegar will do the trick.
Vanilla
A splash of vanilla adds warmth and flavor to the pavlova. It’s optional, but highly recommended for that classic touch.

Toppings for Pavlova
Lemon Curd:
I LOVE having a lemon curd layer in pavlova. The tart, citrus flavor is the perfect counterpoint to the sweet, airy meringue and pairs beautifully with fresh fruit.
No lemon curd on hand? No problem! You can still add tang by mixing yogurt into your whipped cream. Lemon or lime-flavored yogurt works wonderfully.
Start whipping the cream, and after about a minute (once you’ve reached soft peaks), add ⅓ cup yogurt for every 1 cup of heavy whipping cream. Continue whipping until the cream is thick and luscious.
Whipped Cream:
The contrast between the crunchy/marshmallowy/sweet pavlova and the creamy/cool/not too sweet whipped cream is heavenly! I highly recommend whipping your own whipped cream using minimum amount of sugar.
Fruit:
Fresh fruit is the crowning glory of pavlova. Use what’s in season to keep things fresh and exciting.
- Berries like strawberries, raspberries, blueberries, and blackberries are classic and always delicious.
- Stone fruits like peaches, nectarines, or cherries are amazing in summer.
- Exotic fruits like passionfruit, kiwi, or mango bring a tropical twist.
- Oranges, Kiwi and pomegranates are a beautiful winter combination.
Frozen or canned fruit works too! Just make sure to:
- Drain canned fruit very well.
- Be selective with frozen fruit—thawed berries or smaller fruits (like wild blueberries) often hold up better. Or, use frozen fruit to make a vibrant sauce to drizzle over the top.
For a winter pavlova, I’ve used frozen wild blueberries and raspberries. Their smaller size means they stay pretty even after thawing, and their natural juices add a delightful touch of color and flavor to the pavlova.
Final Garnish:
Just when you think your pavlova masterpiece is complete—add one last finishing touch to truly make it unforgettable! A thoughtful garnish adds texture, flavour, or a pop of colour, elevating your dessert to the next level. Here are some simple yet stunning ideas:
- Toasted nuts: Almonds, pistachios, or hazelnuts add a delicious crunch and a hint of nuttiness.
- Lightly toasted shredded coconut: A tropical twist with a golden hue for extra flair.
- Crumbled pavlova pieces: Use small, crispy bits of leftover pavlova to keep the focus on meringue while adding visual interest.
- Fresh chopped herbs: Mint, lemon verbena, lemon balm, or even basil provide a surprising, aromatic freshness.
- A dusting of powdered sugar: For a classic, snowy finish that looks as good as it tastes.

Frequently Asked Questions About Making Pavlova
- What’s the difference between baked meringue and pavlova?
- It all comes down to texture. Pavlova is basically a meringue with cornstarch that’s baked slightly less so it has a soft marshmallow-like interior. Baked meringue on the other hand is made without cornstarch and is dry and crispy throughout.
- What does the name pavlova mean?
- Pavlova is named after the Russian ballerina Anna Pavlova. The dessert is said to have been created in her honor during one of her tours to Australia or New Zealand in the 1920s. Pavlova continues to be a very popular dessert in Australia and New Zealand.
- How can I prevent pavlova from collapsing or cracking?
- Go Small for Stability: Smaller pavlovas, like mini pavlovas or individual portions, bake faster and more evenly. This minimizes the chance of a soggy center or structural weaknesses that can lead to collapsing. Plus, they’re adorable, can be formed to create festive/seasonal shapes and are much easier to serve.
- Slow and Steady Cooling: Once baked, let your pavlova cool in the oven with the door slightly ajar. Sudden temperature changes can cause it to collapse or crack.
- Don’t Rush the Whipping: Make sure your egg whites are whipped to stiff, glossy peaks, and that sugar is fully dissolved to create a stable structure.
- Handle with Care: Be gentle when spreading your meringue on the baking sheet, and avoid overloading it with heavy toppings that could weigh it down.
- What if my pavlova gets cracks and collapses?
- Don’t worry! While it may not look as perfect as you hoped, it will still taste delicious. By the time you add all the toppings, often the cracks aren’t visible and no one will know. If there’s severe breakage – turn your pavlova into fancy parfaits. Crumble the baked pavlova into a crumbly layer in fancy glasses in between the lemon curd, fruit and whipped cream. It may not be what you imagined, but your guests will love it!
- How far in advance can I make pavlova?
- You can make the base a day in advance. Store it in an airtight container at room temperature. However, it’s best to assemble it just before serving to prevent it from becoming soggy. I do not recommend freezing pavlova.
- Why is it important to use a glass or metal bowl?
- Glass or metal bowls are preferred for whipping egg whites because they are non-porous and won’t absorb any grease or residue. To be extra cautious, dab some vinegar on a paper towel and wipe out the bowl to eliminate any trace of fat which can prevent the egg white from whipping properly.
- Can I add flavor to pavlova, such as cocoa?
- Yes, you can add flavor to pavlova. Cocoa powder is a great option for adding a delicious chocolatey twist to your pavlova.
- Use about 1-2 tablespoons of unsweetened cocoa powder for every 4 egg whites.
- Once your egg whites are whipped to stiff peaks and the sugar is fully incorporated, gently fold in sifted cocoa powder with a spatula. Be careful not to deflate the meringue.
- How do I make different shapes and sizes of pavlovas?

Recipe for Classic Pavlova

Pavlova with Mixed Berries
Ingredients
- 6 large egg whites at room temperature
- 1 1/2 cups granulated sugar lump free
- 1 1/2 tsp cornstarch
- 1 1/2 tsp cream of tartar or white vinegar
- 1 tsp vanilla extract
Toppings
- 1 1/2 cup whipped cream
- 1 1/2 cup mixed berries strawberries, blueberries, raspberries, blackberries or other fruit like kiwi, oranges, pomegranates
- 3/4 cup lemon curd
- 2 Tbsp mint fresh, chopped
Instructions
- Preheat oven to 300°F (150°C) (remember to lower the temp when putting pavlova in oven). Line a baking sheet with parchment paper.
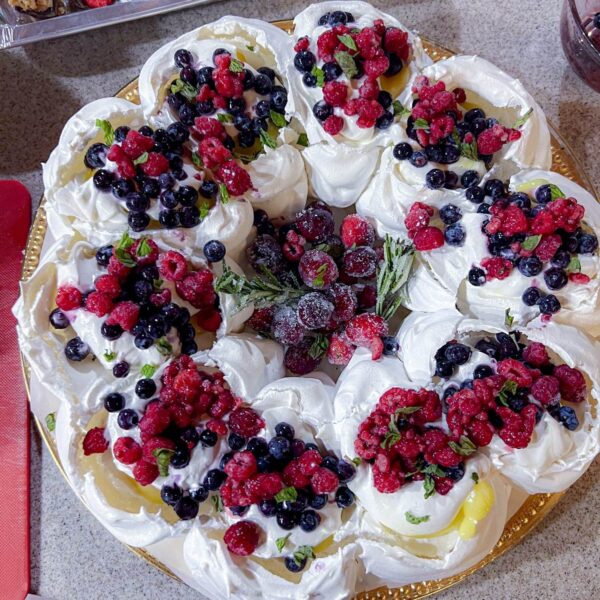
- To Make a Wreath: Draw a wreath template to ensure you get one dollop per guest. Draw two circles on the back side of the parchment paper. Make a 10 inch (25 cm) then a 6 inch (15 cm) circle inside to create a wreath. Draw 8 to 10 circles in between the two rings.To Make Mini-Pavlovas: No template required, but you may want to prep two baking sheets to allow at least 1-2 inches between each mound.

- In clean, dry glass or metal bowl (must be free of any traces of grease), beat egg whites with an electric mixer starting on low speed. Gradually increase speed until soft peaks form. Add cream of tartar (or vinegar) to side of bowl and beat in. Add cornstarch and beat in. While beater is running, slowly add sugar, one tablespoon at a time until the mixture is stiff and glossy.
- Beat in vanilla extract until just combined.
- Spoon stiff egg whites into a clean piping bag with a large plain tip or simply a plastic bag with a corner cut out. Pipe individual mounds or follow your pencil markings to create a wreath. Use back of a spoon to make a divot in each mound.
- Place baking sheet in preheated oven and immediately reduce the temperature to 225°F (107°C). Bake for 50 – 60 minutes. No peeking or bouncing while pavlova is baking! The exterior should feel crisp, and the pavlova should lift off the parchment paper easily. You don't want the pavlova to turn brown. Turn off oven and let Pavlova cool completely (at least one hour) to prevent it from collapsing or cracking.
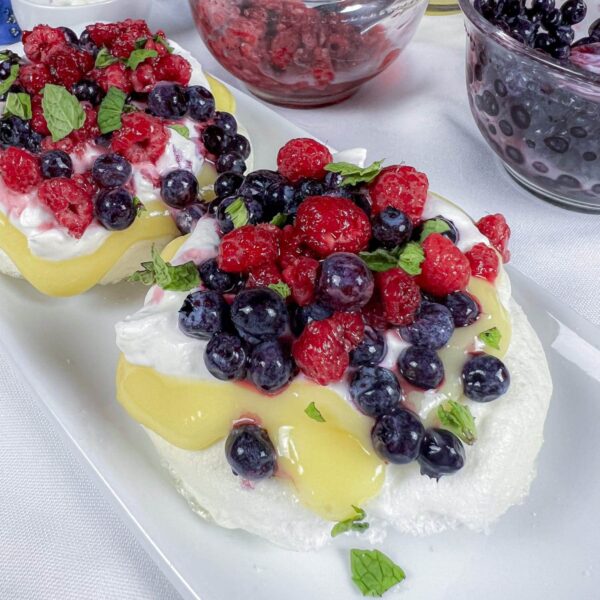
- Once cooled, carefully transfer Pavlova to serving plate. To each divot add 1 Tbsp lemon curd followed by 2 Tbsp whipped cream and 2 Tbsp berries. Garnish with mint or toasted almonds or coconut.
- Slice carefully between dollops and serve immediately.


Notes
Nutrition Facts (per serving)

Cook with the seasons, effortlessly! I’m Getty, a food educator and Professional Home Economist, helping you select, store, and serve seasonal ingredients in delicious, simple, everyday meals. Sign up for seasonal tips and recipes delivered straight to your inbox, and dive deeper with my books, guides, or YouTube content.
I can’t wait to try this recipe! I love that you explain in an easy-to-understand way how to make Pavlovas! Before coming across your blog, I felt that it was almost impossible to do Pavlovas! Not anymore! Thank you!
You can do it!