Want to cook chickpeas from their dried state, but not sure how or how many to cook? You’ve come to the right place! Read on to learn:
How to Soak & Cook ChickpeasHow to Cook Chickpeas in an Instant Pot or Pressure CookerCommon Chickpea MeasurementsHow to Store and Freeze ChickpeasWhether or Not to Add SaltBenefits of Cooking Chickpeas from ScratchChickpea Recipes
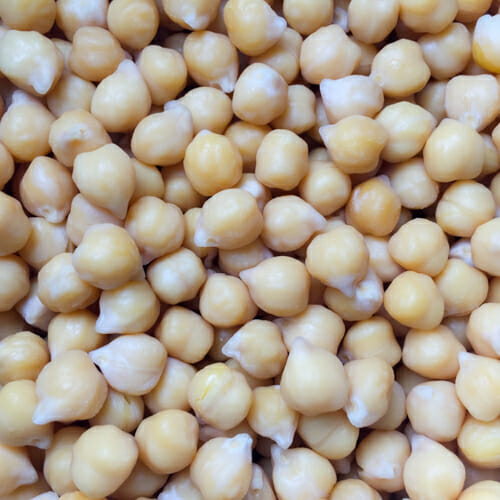
Soak and cook dried chickpeas on the stove. Instructions for long soak and quick soak method with hints for how to get the right texture for salads or hummus.
Prep : 12 hourshrs
Cook : 1 hourhr30 minutesmins
Ingredients
1cupdried chickpeas
3cupswater for soaking
8-10cupswater for cooking
Instructions
Rinse and sort through chickpeas removing any discolored peas or any debris.
Long Soak
In large bowl, combine 1 cup chickpeas and 3 cups cold water.
Let rest on counter for 8 hours or overnight.
Quick Soak
In large pot, combine 1 cup chickpeas and 3 cups cold water.
Bring to boil and boil for 2 minutes.
Turn off heat, cover pot and let rest for 1 hour.
Drain chickpeas and rinse well.
Cook chickpeas
Measure soaked chickpeas and add to large pot. You should have about 3 cups soaked chickpeas.
For each cup of chickpeas add 3 cups cold water to pot.
Cover with lid and bring to boil.
Reduce heat and simmer chickpeas for 1 to 1 1/2 hours with lid slightly askew.
After 1 hour, remove a chickpea from the water. Cool slightly and taste for texture. Continue to cook and taste until desired texture.
For chickpeas for soups or salads cook until tender but still slightly firm.
For soft chickpeas for hummus or creamy curries, continue to cook until very tender.
If needed, add more water to pot for longer cooking time.
When done, drain chickpeas, rinse and use in your favorite recipe.
Keep in fridge for 3-4 days or in freezer for 6 months.
Notes
For more helpful chickpea tips and measurements read article accompanying this recipe at www.gettystewart.com
Cooking beans in a pressure cooker will speed up the cooking process for sure. Pre-soaking your beans before pressure cooking is optional, but there are benefits of doing so. I recommend you soak chickpeas in order to…
get softer beans with more consistent texture (ideal for hummus)
get fewer split skins
reduce gas and bloating by removing some of the oligosaccharides
Soaking is easy.
In a very large bowl add 3 cups water for every 1 cup dried, raw chickpeas and let soak for 8 hours or overnight.
If you forget, do a quick soak in your pressure cooking as described here.
Cooking Chickpeas in the Instant Pot or Pressure Cooker
Rinse beans – whether soaked or not soaked.
Add to pressure cooker.
Add 3 cups water for every 1 cup of beans. DO NOT fill more than half full including water.
Add 1 Tbsp of oil to prevent foaming.
Put lid on and seal vent. Select high pressure (12 psi) and set timer for 35-40 minutes for non-soaked chickpeas or 10-15 minutes for soaked chickpeas. If your pressure cooker goes to 15 psi, you’ll need even less time. Cook non- soaked chickpeas for 28-32 minutes and soaked chickpeas for 7-12 minutes. Choose the lowest time if you want firmer beans for salads or roasted chickpeas and the longest time for softer chickpeas ideal for curry or hummus.
When finished cooking, let pressure release naturally (about 30 minutes). This will result in fewer split skins.
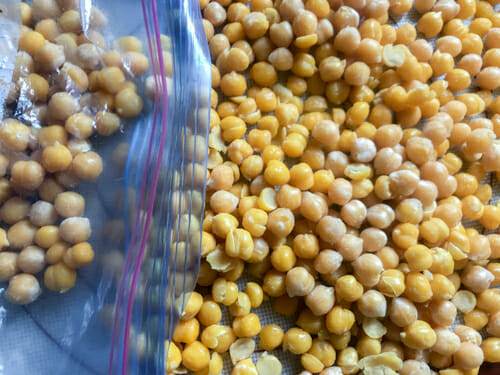
Dried and soaked chickpeas.Helpful Hints:
Continuous boiling will lead to more broken chickpeas, so turn heat to low and simmer chickpeas instead of boiling them.
Soaking chickpeas will help reduce gas and bloating.
Chickpeas will expand to three times their size – use a really big bowl & pot!
Old chickpeas will take longer to cook and may never become super tender, buy dried chickpeas at a store with high turnover.
For firm chickpeas leave the lid off; perfect for chickpeas used for salads, soups and chili.
For tender chickpeas intended for smooth, creamy recipes like hummus cook with the lid on, slightly askew to allow steam to vent.
Make extra and freeze. Cooked chickpeas freeze very well, see below for how to.
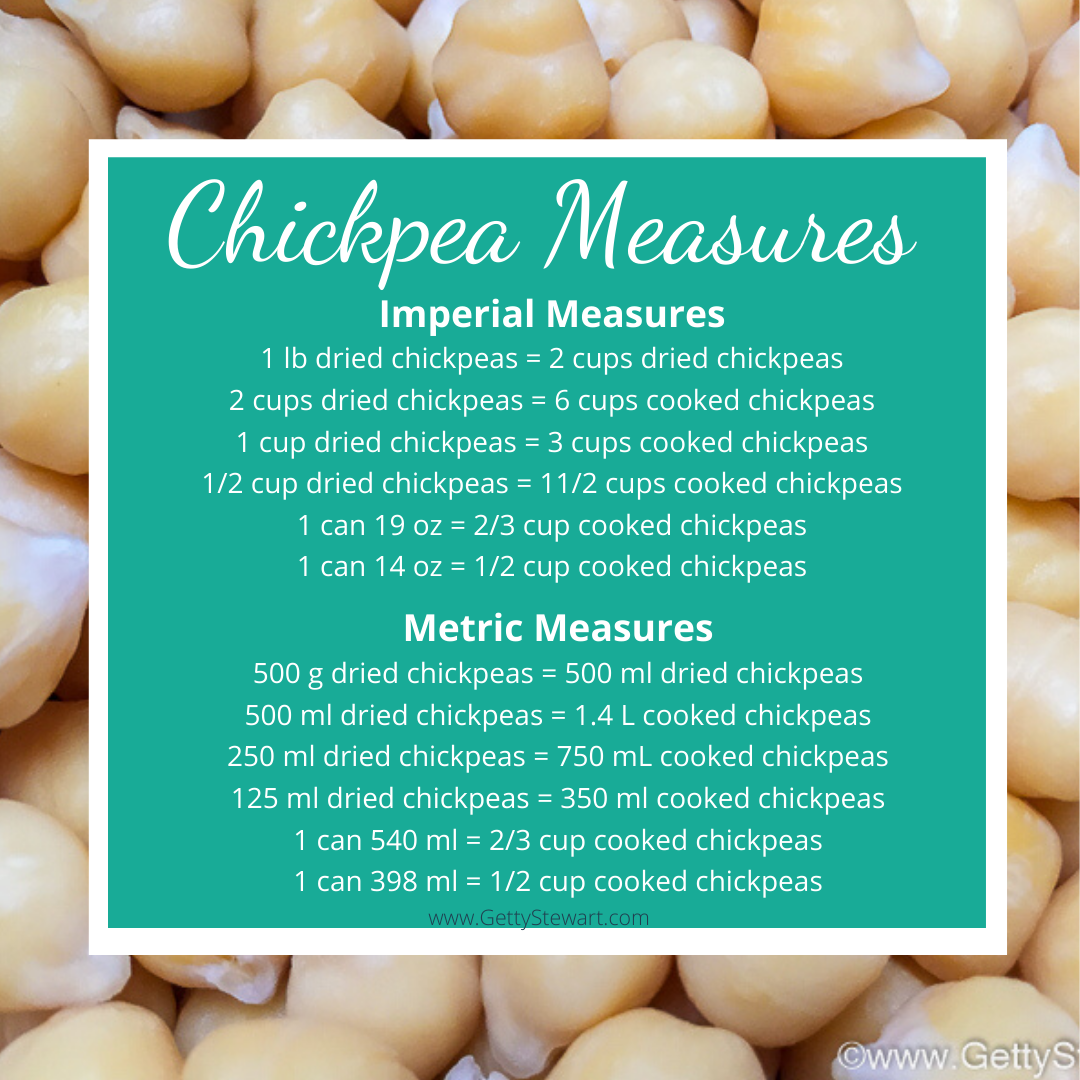
Chickpea Measurements – How Many Chickpeas?
Here’s a handy dandy reference chart for those times when a recipe calls for an amount you need to convert.
Storing and Freezing Cooked Chickpeas
Store cooked chickpeas in a covered container in the fridge for 3 to 4 days.
Freeze cooked chickpeas in an airtight container or freezer bag for up to one year, although quality will be best if used before 6 months.
To have free flowing frozen chickpeas where you can easily measure and pour out a certain amount, freeze chickpeas on a large cookie sheet. Pat cooked chickpeas dry, place on a large cookie sheet in a single layer, freeze for 1 to 2 hours then transfer to freezer bag.
Freeze on tray for free flowing chickpeas.Once frozen, keep in freezer bags, removing as much air as possible.
Adding Salt to Chickpeas
Whether or not to add salt when soaking or cooking chickpeas is totally up to you. I prefer not to add salt when cooking chickpeas, instead I like to season the final recipe that I’m using them in.
However, if you want the added flavor you can add salt as well as other aromatics (onions, garlic, bay leaf, soup stock) when cooking your chickpeas.
There is some debate about when to add salt – in the soaking phase, early in the cooking process or late in the cooking process. All of them will impart a salty flavor. Some say adding it early will prevent chickpeas from getting tender. Others say salting earlier means you’ll have less splitting.
It’s up to you to experiment. I’ve read to use 1 teaspoon (5 ml) per 1 cup (250 ml)of chickpeas, others recommend 1 tablespoon (15 ml) per quart/litre of water. If you experiment with how much and when to add salt, let me know your preference!
Benefits of Cooking Chickpeas from Scratch
I don’t always cook chickpeas from scratch. When time is scarce and I’ve run out of frozen chickpeas I turn to canned chickpeas – they’re still a super healthy food, especially if you rinse them well to remove as much sodium as you can. However, I do enjoy homecooked chickpeas the best, both for flavor and texture. And talk about AFFORDABLE! In a nut shell, here’s why I think cooking chickpeas from scratch is the way to go – when you can.
It’s easy. Even though it takes time, all the steps are super easy.
It’s affordable. Cooking dried beans (chickpeas are also known as garbanzo beans) is super cheap. Not that canned chickpeas are super expensive, but if you’re into pinching pennies, you’ll love the value – $1.19/2 cups canned chickpeas versus $.43/2 cups dried chickpeas.
It’s customizeable. You can cook your chickpeas as soft or hard as you’d like based on how you will use them. Cook them longer to get nice soft peas for hummus, or leave them a little firm for salads and curries.
It’s tastier. The chickpeas will be more flavorful without any danger of tin can flavor when cooked at home.
It’s less salty. No preservatives, no added sodium. You are in control of what ingredients are added.
It’s more environmentally friendly. A reader, Cathleen, pointed out that bulk chickpeas requires less packaging especially when you consider that not all cans get recycled.
Hi Getty
I’ve been soaking and cooking chick peas as we like them for snacking, adding to soups and salads and making hummus bit I’ve never thought of freezing them. Will definitely be trying that and vacuum packing them to take to the cottage. Don’t like to spend a lot of time cooking there as it cuts down on our hiking and canoeing time. Do a lot of soups and meals beforehand to freeze. Contemplating getting a sous-vide bit want to do a bit more investigation first.
Hi Marlene,
Thanks for sharing your prepping strategy. I’m like you, when going away I like to prep as much as possible. Pre-cooked, frozen chickpeas are a great idea. If you like hiking and canoeing, you might also enjoy packing a frozen bag of hummus. I will freeze a small portion in a freezer bag and tuck it into the backpack first thing in the morning. By lunch or snack time, the hummus is thawed but still cool. On a 7 day backcountry trip, I actually dehydrated the hummus and reconstituted it on the trail. Nice treat!
Keep me posted on your sous-vide experiments! I’d love to know what you think of it, I do not have one.
Getty