Dehydrating Equipment – What you Need to Get Started
Here’s a list of equipment needed for dehydrating food. If you’re looking at buying a dehydrator and getting started in dehydrating food, here are my thoughts on what you need and what you don’t.
Read more: How to Properly Store Dried Food, Top 12 Tips for Dehydrating Food, Temperatures for Drying Food, Favourite Dehydrating Recipes.

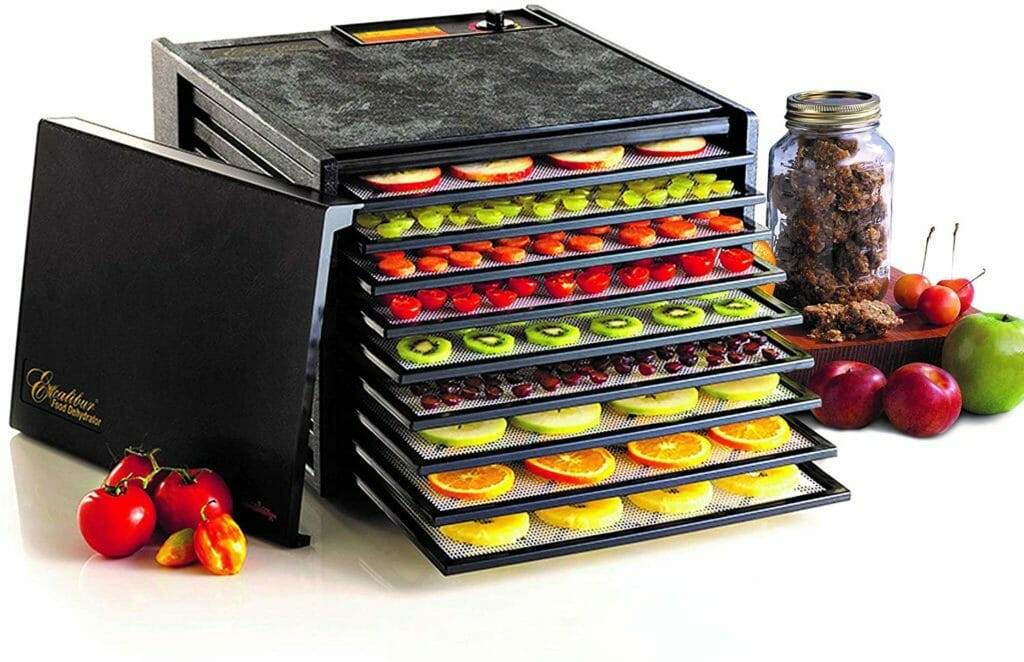
I’ve used a 9 tray Excalibur dehydrator since 2011 to preserve fruits and vegetables and for making meals to take on trips. I’ve led numerous dehydrating workshops and have spoken to hundreds of people about their dehydrating experience. This article is based on my personal experience and what I’ve heard from others I trust in the kitchen.
This post contains affiliate links. If you use these links to buy something I may earn a commission. Thanks.
2 Tips to get started
- Get the best equipment you can afford. While the initial investment is high, you’ll be less frustrated and it’ll last you for decades. Remember, good equipment has great resale value – should you decide you don’t want to continue dehydrating.
- Choose equipment that fits your personal needs and goals. Are you interested in making a few snacks, preparing food for trips or outdoor activities, preserving all your garden produce, making jerky or stocking an emergency food pantry? The more intense you want to get, the more research you should do into the size, quality and cost of equipment.
Equipment Needed for Dehydrating
Electric Dehydrator
When it comes to dehydrators – you get what you pay for! Small, cheap dehydrators are small and cheap. They dry food, but the process is frustrating with hot and cold spots, parts that break, machines that are difficult to clean and cumbersome to use. You’re better off borrowing or buying a good quality, used dehydrator than getting a cheap model.
Consider your choices carefully and be sure to read reviews and get opinions from others.
Two Common types of Electric Dehydrators
1) Round & Stackable with Vertical Air Flow – Round dehydrators with a core channel in the center to allow heated air to flow through vertically. The donut shaped trays are typically removable and stackable for small or large batches. For best drying these trays must be rotated throughout the process. These units are the most affordable and vary greatly in quality. Look for a unit where the fan and/or heater are on the top, rather than the bottom so food droplets don’t land on the heating element (hard to clean and potentially destructive).

2) Square Trays with Horizontal Air Flow– Square dehydrators with trays that can slide in and out for easy checking. Airflow is pushed from the back of the unit via one or two fans allowing for more even air flow across all food. These units come in set sizes and offer various options. For large volumes with little hands-on work these larger, higher priced units are worth considering.
For either type, check for the following:
- Temperature control – adjustable thermostat so you can control the temperature ranging from 95 -165ºF or 35-73°C
- Watts – power for heating and air flow, look for at least 500 watts or more for reasonable drying time
- A Fan – creates air flow for better, quicker more consistent results but they also cause more noise
- Sturdy Construction – for a long lasting, easy to clean machine, look for sturdy, double wall construction of metal or high-grade plastic
- Convenient Trays – look for sturdy trays – either stainless steel or high-grade plastic with removable/flexible plastic mesh to make it easier to remove food and clean. Rigid plastic trays with built in mesh are harder to clean and I’ve heard that they can crack or warp.
- Four Tray Minimum – get a unit with at least four trays – you’ll outgrow anything smaller very quickly
Options I wouldn’t Pay Extra For:
- Glass Door: Watching food dry is on no-ones must see list! There’s no way you can tell if food is dry or not through a glass door. It’s cute, but not necessary.
- Timer: A timer is a nice option, but I wouldn’t pay extra for it. Exact timing varies every time you dehydrate something, so you can’t rely on a set time. That said, if you can’t check your dehydrator at the approximate time, it’s nice to have your dehydrator stop the drying process until you can check it – just don’t forget about it!
PRO TIP: If you ever need an auto-shut off for your dehydrator, plug it into a timer at the electrical outlet – like the one for Christmas tree lights.
Liners
Trays come with built in mesh grates or separate mesh sheets. These are ideal for pieces of food the size of a chickpea or larger. For smaller food, fruit leather, pastes, soups or other liquid food you need liners. Most dehydrator manufacturers will sell Paraflexx or silicone based sheets to fit their dehydrators. Buy them or some sort of alternative – you will definitely need them.

They’re not cheap, but they are necessary and getting good ones that will last for 10 years or more is well worth it. When I first bought my 9 tray dehydrator, I bought 5 liners. It wasn’t often that I needed liners for all 9 trays at a time so it was a good start. When I needed more, I used parchment paper. A couple of years ago, I bought some of these reusable silicone liners at the grocery store. I cut them to fit my trays and they work quite well.

PRO TIP – NEVER use Wax Paper in the dehydrator, food will stick and never come off! Foil is also not great. In a pinch you can use plastic wrap, but you’ll need to flip the food on the wrap and extend drying time since air cannot pass through foil or plastic wrap.
Cutting & Slicing Tools
Consistent sized food is very important for even, safe drying.
A good knife and cutting board will definitely do the trick. But when filling a whole dehydrator, sometimes a tool to keep your slices consistent is helpful. When I’m filling my dehydrator I pull out my mandoline, food processor or apple peeling device – whatever will make the job easier.

Immersion Blender/Food Processor
A blender or powerful food processor will help with preparing food both before dehydrating (e.g. making smooth fruit leather or soup puree) and after dehydrating (e.g. making garlic powder).
Spreading Tool
A smooth even layer of spreadables will dry vegetable bark, leftovers and fruit leathers better. A large knife or silicone scraper will work, but an off-set spatula makes it even easier.

Grinders
If you want to make powders or food that’s quick to re-hydrate you need something that will turn your dried food into a powder. A chopper, food processor, mortar and pestle, spice or coffee grinder will work.
I use an old coffee grinder I bought at a second hand shop to make powders or instant meals for the trail. I find a coffee grinder creates a finer powder than my food processor.

Airtight Containers/Bags
Once you’ve dehydrated your food, you’ll need to store it properly. You need air tight containers or bags.
I use recycled glass jars to store my dehydrated food. When I take dried food on trips, I usually use Silicone Bags” target=”_blank” rel=”noreferrer noopener sponsored nofollow”>reusable silicone bags, plastic containers or vacuum sealed bags.
For long term storage (more than a year), you can also use food grade mylar (metalic) bags that will lock out oxygen and light. Look for bags without a window panel to keep light out. I have never used them so am hesitant to recommend a particular kind, just research them carefully to ensure you get a good quality bag.

Vacuum Sealer
Vacuum sealing will extend shelf life even further but is not necessary for food that will be used within six months to a year. Read more about How to Properly Store Dehydrated Food.
It is ideal if you are taking dried food into a humid environment or if you are storing food beyond a year. Look for a vacuum sealer with an attachement that can do bags and jars.

 Oxygen Absorbers
Oxygen absorbers are useful if you’re planning to keep dehydrated food for more than one year. I have never used them because I circulate through my food fairly quickly.

 Marker or Grease Pencil
Do not underestimate the need to label your food. You likely won’t have trouble identifying a dried pea – but is that white powder dried cannellini beans, mashed potatoes, mushrooms or cauliflower soup? You also want to include the packaging date so you know how long your food has been on the shelf. And if you’re hitting the trail, you’ll want rehydrating and cooking instructions.
A sharpie works great on plastic bags. For glass jars or lids that I want to reuse, I like using grease pencils. If I’m feeling really crafty, I use chalkboard paint to cover old jar lids, then I use a white grease pencil to write with. An eraser will take off the writing and leave the paint so I can wash and reuse the lid for something else.

That, my friends, is my recommended list of dehydrating equipment. What am I missing? Do you have a tool or piece equipment you use regularly when drying food?
Other Great Dehydrating Info
- How to Properly Store Dried Food
- Top 12 Tips for Dehydrating Food
- Temperatures for Drying Food
- Favourite Dehydrating Recipes
Keep me in the loop and share your ideas. Leave a comment below or tag me on Instagram @getgettys and Facebook @GettyStewart.HomeEconomist.
Sign up to get articles by Getty delivered to your inbox. You’ll get recipes, practical tips and great food information like this. Getty is a Professional Home Economist, speaker and writer putting good food on tables and agendas. She is the author of Manitoba’s best-selling Prairie Fruit Cookbook, Founder of Fruit Share, a mom and veggie gardener. When she’s not working on growing or cooking food, she’s likely hiking or kayaking in the backcountry.