Easy No Knead Bread – Crusty Artisan Bread
This no knead bread is one of our favorite homemade crusty breads. It is easy to make and nothing beats the taste of fresh homemade bread. This recipe makes enough for 2 fresh baked loaves – make them at the same time or make one loaf today and another later in the week – yup, you can refrigerate this dough!

Also Read: No-Knead Cottage Cheese Dill Bread, Pizza Dough, Sandwich bread, Sourdough Bread
How Does No-Knead Bread Work?
When I first discovered no-knead bread many decades ago – I was blown away by the amazing results and wanted to know HOW it worked! In very general terms, here’s why it works:
- Long Rest/Rise Time – The long fermentation or rise time allows the enzymes in flour to break down and the gluten to develop automatically, without the mechanical action of kneading and with less yeast. That’s why, the longer you let it rise, the more flavour and better structure you’ll get.
- Higher Hydration – No-knead dough uses more water than kneaded doughs. This additional water helps gluten develop better during the fermentation process. Well-developed gluten contributes to a better structure and texture in the final bread. More water also makes the bread crust crispier and leads to a lighter and chewier texture. But more water also makes the dough sticky and a little more challenging to shape. You can experiment with the amount of water a little bit – less water for easy to work with dough – more water for crispy crust and lighter, crispier texture.
- Steam – Baking the bread in a heated closed Dutch oven creates steam which allows the bread to rise before the crust develops. Even if you don’t have a Dutch oven, you can create steam and have delicious bread – see below.
If you love kneading as much as I do and have time up front try this sandwich bread.

Benefits of No-knead bread?
- Easy & Beginner Friendly: No-knead bread recipes are incredibly simple. You don’t need to figure out kneading techniques or the correct temperature for proofing dough. The longer fermentation means there’s more wiggle room and less obsessing! Use less yeast and let the dough rest at a cool or room temp.
- Efficient Use of Time: Active, hands-on time is minimal. All the work is done when you let the dough rest and ferment. Make it in the morning before you start work (3 minutes of your time), let it ferment and do its thing during the day then bake it at the end of the day. The prolonged resting time means you can go about your day while the dough does most of the work.
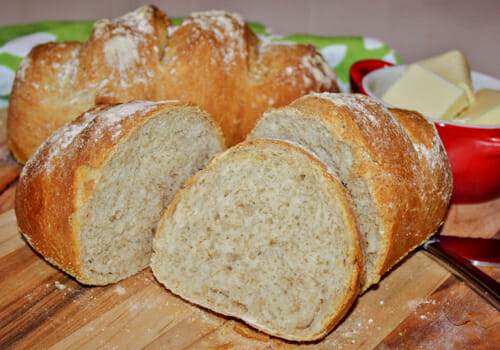
- Artisanal Texture and Flavour: If you love in a chewy interior, an open crumb structure, and a crusty exterior—characteristics often associated with artisan-style bread from professional bakeries – you’ll love this bread.
- Minimal Equipment Required: No-knead bread can be made with basic kitchen tools. While a Dutch oven is commonly recommended, see below for alternatives.
Want to add more flavour to your no-knead bread – make this Cottage Cheese Dill No Knead Bread

Tips for No-Knead Bread Success
Use high-quality ingredients:
Choose high-quality flour, fresh yeast (the best before date actually matters on yeast!), and filtered water for the best results. The simplicity of no-knead bread means that each ingredient plays a crucial role in flavor and texture.
Be patient with fermentation:
Allow the dough to ferment for an extended period, typically 10-18 hours, to ensure optimal gluten development. This slow fermentation process contributes to the bread’s unique taste and texture.
REALITY – I typically make the dough first thing in the morning and bake my first loaf for dinner that day. So the rise time is about 10 hours. The bread is FANTASTIC even if it’s not the full rise time. I store the other half of the dough in the fridge (well wrapped and sealed) and bake it later in the week – this loaf is a littler lighter and airier – perfect! Both are mind blowing compared to store bought bread.
Experiment with hydration levels:
Adjusting the hydration level (amount of water) of your dough can lead to different textures. Play around with the ratio of water to flour to find the perfect balance for your taste preferences. You’ll notice the difference in the chewiness, how big the air bubbles are and how crispy the crust is. The more water the chewier, airier and crispier – but the more challenging it will be to shape.
Invest in a Dutch oven:
If you’re going to make no-knead bread on repeat, I do recommend getting a Dutch oven. I’ve made many loaves on sheet pans and in my cast iron pan and they were all great – but the Dutch oven is definitely easier and makes a prettier loaf.

Homemade Artisan Bread without a Dutch Oven
It is possible to bake no knead bread or other artisan bread without a Dutch Oven. The Dutch oven is a popular choice because it creates a steamy environment, which helps develop a crispy crust. Without a Dutch oven, you might experience differences in texture, color and rise. The bread is a little more uneven and rustic but equally delicious! Not having a Dutch oven doesn’t mean you can’t make delicious no-knead bread, try these alternatives:
Note: Use less water in your dough when baking on a baking sheet. The dough will hold it’s shape better when formed.
- Baking Stone or Baking Sheet:
- Shape your dough on a piece of parchment paper.
- Place the parchment paper with the dough on the hot baking stone or baking sheet in the preheated oven.
- About 10 minutes before placing the bread in the oven, put a metal or oven-safe tray on the lower rack. Just before you put your bread in the oven, fill this tray with water or ice cubes to create a steamy environment in the oven. Just be careful – there will be hot steam, don’t get steam burn!
- Bake for 30-40 minutes or until the crust is golden brown and the bread sounds hollow when tapped on the bottom.
- Cast Iron Skillet:
- Preheat a cast-iron skillet in the oven.
- Carefully transfer the shaped dough onto the hot skillet. I like using parchment paper as a sling for this.
- Bake, covered with foil for the first 20 minutes, then uncover and bake for an additional 15-20 minutes until the crust is golden.
- Loaf Pan:
- Shape the dough into a loaf and place it in a well-greased or parchment-lined loaf pan.
- About 10 minutes before placing the bread in the oven, put a metal or oven-safe tray on the lower rack. Just before you put your bread in the oven, fill this tray with water or ice cubes to create a steamy environment in the oven. Just be careful – there will be hot steam, don’t get steam burn!
- Bake for approximately 40-50 minutes or until the top is golden brown.
Keep an eye on the bread towards the end of the baking time to ensure it achieves the desired color and doneness.

Refrigerating Bread Dough:
Don’t want to make two loaves today? You can save and refrigerate the dough to make another day. Here’s how:
- Divide the Dough: After the initial fermentation, divide the dough in half before the shaping and final rise.
- Use an Airtight Container: Place the divided dough in a well-sealed, airtight container. This prevents the dough from drying out and absorbing any odors from the refrigerator.
- Refrigerate Immediately: Place the container in the refrigerator as soon as the dough is divided. The cold temperature will slow down the fermentation process, allowing you to extend the time before baking.
- Use Within a Week: For optimal results, use the refrigerated dough within a week. The flavor will continue to develop, and you’ll enjoy the convenience of having freshly baked bread on demand.
- Bring to Room Temperature Before Baking: When ready to bake, remove the dough from the refrigerator and let it come to room temperature for about 1-2 hours before shaping and baking. This ensures a good rise and a flavourful loaf.
How to Freeze Homemade Bread:
If you want to freeze a fully baked loaf for future consumption, follow these steps:
- Cool Completely: Allow the baked loaf to cool completely at room temperature. This prevents condensation from forming inside the packaging.
- Wrap Well: Wrap the fully cooled loaf tightly in plastic wrap or aluminum foil. Ensure that the wrap is sealed securely to prevent freezer burn.
- Place in a Freezer Bag: For extra protection, place the wrapped loaf in a freezer-safe plastic bag. Squeeze out as much air as possible before sealing.
- Label and Date: Clearly label the package with the date and type of bread to keep track of freshness.
- Freeze Quickly: Place the wrapped and bagged loaf in the freezer as soon as possible to maintain its quality.
- Thaw Before Serving: When you’re ready to enjoy the bread, remove it from the freezer and let it thaw at room temperature. Reheat in the oven for a few minutes to restore its crustiness.
No Knead Bread Recipe
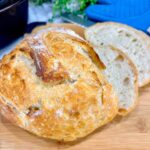
Easy No Knead Bread – Crusty Artisan Bread
Ingredients
- 2 3/4 cups lukewarm water
- 1 tsp instant yeast
- 6 cups all purpose flour
- 2 1/2 tsp salt
- cornmeal optional
Instructions
- In a large bowl, mix yeast and lukewarm (100°F/38°C) water. Let rest 3-5 minutes.
- Stir in flour and salt, mixing until there are no dry patches. Dough will be difficult to stir, but too wet to knead or work with hands.
- Brush top of dought with a little oil (to prevent sticking to cover) and cover dough with beeswax or plastic wrap and a clean cloth. Let rise at room temperature for 12 -18 hours (overnight) for beautiful, airy bread.
- After the rising period, dough can be baked or stored, covered in the fridge for one week (see article for details).
Baking on Baking Sheet
- Sprinkle flour on dough and cut off half the dough.
- With floured hands, turn dough in hands to lightly stretch the surface, creating a rounded top and a lumpy bottom. Use as much flour in your hands as needed and form into an oval artisan bread shape.
- Place on lightly greased baking sheet sprinkled with cornmeal (if using) where dough will be placed. Repeat with remaining dough, or leave in fridge for another day.
- Dust top of dough lightly with all purpose flour. Cover and rest for 20-30 minutes while preheating oven to 450°F/232°C.
- OPTIONAL Steam Infusion: About 10 minutes before placing the bread in the oven, put a metal or oven-safe tray on the lower rack. Just before you put your bread in the oven, fill this tray with water or ice cubes to create a steamy environment in the oven. Just be careful – there will be hot steam, don't get steam burn!
- After final rest and oven has come to temperature, use a serrated knife to make three diagonal slashes on top of the dough. Place in oven.
- Bake until well browned, about 30 minutes or until internal temperature reaches 205°F/96°C.
- Cool on wire rack.
Baking in Dutch Oven
- Tear a piece of parchment paper just slightly bigger than your dutch oven. You will use this to move your bread from the counter to the very hot dutch oven.
- Sprinkle flour on dough and cut in half with a serrated knife.
- Using as much flour as needed on your hands and on the dough, lift out half the dough. Gently shape the dough to roughly match the shape of your dutch oven. Stretch the surface and tuck dough underneath to create a smooth rounded top and a lumpy bottom. Place on parchment paper
- Dust top of dough lightly with all purpose flour. Cover and rest for 20-30 minutes while preheating oven and Dutch oven with lid to 450°F/232°C.
- Once oven has come to temperature and dough has rested for 20 minutes, use a serrated knife to make 2-3 diagonal slashes on top of the dough.
- As quickly and safely as possible, pull hot Dutch oven out of oven, remove lid and using the parchment paper as a sling, move the bread into the Dutch oven. Cover and quickly return to oven.
- Bake covered for 30 minutes.
- Remove lid, reduce heat to 425°F/218°C and bake another 15-20 minutes. Use an internal thermometer to ensure internal temperature reaches 205°F/96°C.
- Cool on wire rack.
Notes
Nutrition Facts (per serving)
Extra Tips for Making No Knead Bread
Mixing and Handling Loose, Sticky Dough
You’ll find that when you mix the dry and wet ingredients for this dough, it will be tough to stir, but too sticky to knead. That’s exactly what you want! Just keep stirring with a sturdy wooden spoon until all the flour has been incorporated.
When it comes to shaping the dough, you’ll need flour to cover your hands and the dough. You could also try using a bench scraper covered with flour to rotate your dough and form a loose ball shape.


How to Tell When No Knead Bread is Done
You can judge based on cooking time, color, and a hollow sound when you knock on the bread. Or, you can do it the easy way and use an internal thermometer to check the temperature of your bread. Because we’re using whole wheat bread, this bread is done when the internal temp is 205°F/96°C.
Other Bread Recipes to Try
You may also want to try these bread recipes:
50/50 Whole Wheat Sandwich Bread
Whole Wheat Soft Hamburger Buns
Sourdough Bread A Beginners Recipe
No Knead Cottage Cheese Dill Bread
If you make this no knead bread recipe, let me know what you think. Leave a comment or take a photo and tag #getgettys so I can see it and like it!
Hi, maybe the nutrition values are incorrect? 1487cal. per serving, sodium 3578mg…etc. Maybe this is for the whole recipe? Thank you 😉
Hi Suzanne,
Thanks for your comment, you’re right, the nutritional values were displayed for whole loaves. I’ve corrected the way the info was calculated. It now shows the nutritional value per slice based on 2 loaves at 15 slices per loaf. Always grateful for feedback that helps me provide better info.
Take care,
Getty