Homemade Comforting Salve with Plantain and Dandelion Blossoms
The itch of mosquito bites or insect stings keeping you up at night? Soothe dry, itchy, insect bitten skin with homemade Comforting Salve made with weeds plants growing in your yard. Homemade Comforting Salve uses common plantain and dandelion blossoms mixed with olive oil and beeswax.

When I made my first batch of salve three years ago, I was skeptical about whether or not my homemade salve would actually promote healing and soothe mosquito bites, but I was willing to give it a shot and figured at the very least, I’d have a great moisturizer with an interesting story to go along with it.

After my first batch I was hooked, it really worked! It takes about 5 minutes for the initial itchiness to go away, but once it’s gone, it’s gone! There’s no more waking up in the middle of the night going insane with itchiness. Such a relief for me and my kids. And, as an added bonus my skin is smooth and moisturized too!
Shortly after that first batch, I made more salve with families at Camp Wasaga during one of the worst mosquito infested summers ever. Campers loved the salve and its soothing effect on their bites. Parents appreciated that they could offer their kids something for their itchy skin without having to worry about the ingredients. Older kids liked being in control of the salve and applying as they needed.
Could it be just a placebo effect? Possibly, but if we all felt comforted and less itchy and the ingredients are what they are – who cares!? Although, I do have some faith in the fact that plantain has been widely used throughout the world and for many centuries in poultices and lotions for treating sunburns, stings, insect bites, snakebites, poison ivy breakouts, rashes, burns, blisters, and cuts. Plantain is approved by the German Commission E as topical use for skin inflammations. (Blumenthal et al., 2000).
Making salve is now something I look forward to at the start of every summer. This year, my friend Chrissy Troy joined me in making a batch.

Here’s the quick and easy recipe followed by more detailed step by step instructions and photos.

Homemade Comforting Salve with Plantain and Dandelion Blossoms
Ingredients
- Infused Oil
- 1 cup plantain leaves
- ½ cup dandelion blossoms
- 2 cups olive oil
- ½ tsp lavender oil
- 2 capsules Vitamin E optional
- Salve
- 2 oz 4 Tbsp or 1/4 cup beeswax
- 2 cups infused oil from above
Instructions
- Gather plantain leaves and bright yellow dandelion blossoms.
- Wash plantain if needed.
- Thoroughly dry plantain leaves and dandelion blossoms by laying out on dry towel overnight. The leaves and blossoms should look wilted.
- Rub, rip and break up the plantain leaves and blossoms to bruise them and release their medicinal properties. This process is known as garbling.
- Place leaves and blossoms in crock-pot and cover with olive oil.
- Turn heat to Keep Warm setting (not the low setting). It's important to use low heat to keep the medicinal properties in tact and create a high quality product.*
- Let infuse for 24 hours.
- Using a fine mesh (eg. cheesecloth, coffee filter) strain the oil into a large measuring cup with a spout.
- Add lavender oil.
- Use oil as is to apply to skin or use this infused oil to make a salve.
- Infused oil can be stored, well sealed for 6 months to 1 year in a dark place.
- Salve
- Melt beeswax in a double boiler or over low heat, stirring constantly.
- Add infused oil.The beeswax will harden quickly in little lumps and clumps with the addition of cold oil. Keep heat on low and stir until wax has melted once again and dissolved into the oil.
- To test the consistency of the salve, place a dab of the oil/wax mixture on a plate. Allow to cool for 2-3 minutes. Feel the dab for consistency, if it is too hard, add more oil to the pot, if it is too soft, add more beeswax to the pot.
- Pour salve into clean, dry containers.
- Cool completely (overnight) before putting lids on.
Notes
You can reheat salve and add more oil or wax several times, even weeks later if you discover the consistency is not to your liking.
Beeswax is a wonderful product, but it is very difficult to clean off knives, bowls and pots, so do not use your best cookware! To clean, heat tools and wipe/scrape away wax with paper towels.
If you prefer more details and a few photos, read on…
Step 1 Selecting & Harvesting the Plants
For my Comforting Salve I chose to use plantain and dandelion blossoms, although you can use a wide variety of plants for various medicinal effects. I chose plantain and dandelion because they’re readily available – in the backyard, school yard, river bank, park, boulevard, abandoned lots, etc. Just choose a location where there’s no spraying and no dogs. My friend Dawn and I picked oodles of plantain while camping earlier this spring.

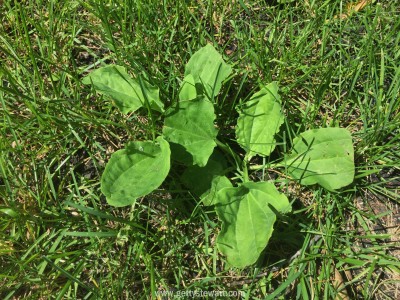
Common plantain (aka white man’s foot because it followed wherever white man set foot) is a low growing, wide leaved plant with fibrous or stringy leaves. When you see it, you’ll recognize and go – oh that plant – isn’t that the plant that’s growing in the cracks in my sidewalk. Yup, that’s it! Later in the summer it will have a long flower/seed spike growing straight up from the center.

The leaves and seeds of this plant are edible. Young,tender leaves can be added to salads or stir fries. For our salve, we use the leaves for their anti-inflammatory, anti-microbial, antiseptic, astringent and immune stimulating properties. The leaves also contain allantoin – a compound that promotes cell growth and stimulates wound healing.
When gathering plantain leaves look for only the finest specimens without tears, holes or signs of insect damage. Wherever you’re picking, you’ll likely have plenty to choose from, so it’s okay to be picky. Simply pinch off the leaves toward the base of the plant.

Dandelions get a bad rap, but if you’re willing to explore a little deeper, you’ll see that they’re extremely versatile. The leaves, roots, and flowers are all edible and have unique properties worth exploring. For our salve, we use the yellow blossoms for their antioxidant, immune boosting and stress relieving properties.
When gathering dandelion blossoms, look for the brightest, prettiest blossoms without any insects in a location that’s free of sprays and dogs. Simply pluck off the flower head.

Step 2 Cleaning & Drying the Plants

To wash your plants or not – it’s totally up to you and the condition of your plants. I don’t wash the dandelion blossoms but I do typically wash the plantain leaves as they tend to trap dirt. To wash them, I put them in a bowl of water and swish them around, then repeat as needed. Once washed, they get a turn in the salad spinner.

Drying the plants is very important! Remember, our goal is to infuse the plants in oil; oil and water do not mix. Therefore we need to remove as much moisture as possible from the leaves and blossoms before they’re bathed in oil. Not only do we want to remove surface moisture or drops of water on the leaves, but we want to let some of the moisture inside the plants evaporate as well. In other words, we want to wilt the leaves and blossoms. Actually, you can even make infused oil with dehydrated or dried plants.
Here’s some plantain leaves that are laid out to dry and starting to wilt.

Step 3 Garbling or Prepping for Infusion
We want those plants to release their nutrients and medicinal properties into the oil. To help with that, we “garble” the plants. In other words we need to tear up, bruise and otherwise rough up the leaves and blossoms. You could even use a food processor to really chop them up – but it’s not necessary.

Step 4 Infusing the Oil
It’s time to let the garbled plant material infuse or soak in the oil. There are three options for infusing.
a)Set a crock pot on KEEP WARM (not the low setting as this is too hot) add the plants and oil and let sit as is for 24 hours. See the setting below.

b)Heat the plants and oil in a double boiler over very low heat for about 4 hours.
c)Mix the plants and oil in a jar, cover it with a cheesecloth, coffee filter or paper towel and let it sit on the counter for 2 weeks.

The idea is to draw out the medicinal properties without cooking them off – that’s why low heat is important. Slow and low is the way to get the best quality product. I’m fairly impatient so typically I use the double boiler or crockpot method. Just remember, if you’re using the jar on counter method, be sure your plant material is really dry as moisture may cause mould to form. Keep the jar where you can keep an eye on it.
Step 5 Adding Lavender Oil and Vitamin E
After the oil has been infused with the plant material you can add essential oils like Lavender, Mint, Tea Tree, etc. for additional medicinal properties or to simply add your favorite scent. I like adding a few drops of 100% pure lavender oil to my mix. I love the smell and its calming effect.
Add Vitamin E by breaking open the gel capsule of Vitamin E pills and using the oil inside. Vitamin E helps extend the shelf life of infused oil and helps repair damaged skin tissue faster. Olive oil naturally contains Vitamin E and already has a pretty good shelf life, so adding additional Vitamin E is optional.
Step 6 Mixing the Oil and Beeswax
The final stage of salve making is to mix the infused oil with beeswax. The beeswax hardens the infused oil and adds anti-bacterial, anti-viaral and anti-inflammatory properties as well. It also acts as an emollient and helps draw moisture to the skin. The more beeswax you add to the oil, the more solid the salve will become. Of course, you could use the infused oil directly on cuts, scrapes or insect bites, it’s just a little messy.
To mix the oil and beeswax you’ll need to melt the beeswax. Do so over low heat so you do not boil it. A double boiler is ideal for this. If you add the hot beeswax into cold oil, the beeswax will harden instantly and form little clumps of wax in the oil. But no big deal, just heat the whole mixture over low heat stirring until everything is nicely combined. Another approach is to heat the oil slightly so you combine the melted wax with warm oil, thereby avoiding the initial clumpy stage.
At camp, where we prepare the salve without a stove, I use a small dessert sized crockpot to melt the wax and I use another crockpot to heat the oil. I then combine the wax with the warm oil in the crockpot. It works very well and there’s no stove needed.

WARNING: Working with beeswax is both a pleasure and a pain. It smells lovely, but it’s tricky to clean. It leaves a sticky, waxy residue on cutting boards, knives, bowls, measuring cups, etc. My best advice is avoid using your good kitchen tools when working with beeswax. When it does come time to clean up, heat your tools slightly and rub off the wax with paper towel. It takes a little time, but it will come off eventually. Alternatively, you can try freezing your tools overnight to see if the wax will crack right off. Here I am cutting the beeswax into small pieces – see the sticky stuff on the knife?

Step 7 Testing Salve Consistency
In my years of salve making I’ve made salve that’s too liquidy and salve that was almost rock hard. Luckily, it’s easy to correct for either of these conditions by just adding more wax or more oil.

Every batch of salve is slightly different and while the recipe above provides a good guideline, you may need to adjust the beeswax amount a little. To know if you have the right consistency, you need to let a little bit of the salve cool so you can feel its texture. Simply dip a teaspoon into the hot wax/oil mix and let it cool for 2-3 minutes. Squish the salve with your fingers and rub it on your forearm to determine if you like the consistency. If it’s too soft, add more wax, if it’s too stiff add more oil (plain olive oil will do). Repeat this step as many times as you need to get the consistency you like. In fact, you can even reheat the salve days, weeks or months later if you feel like you want to adjust the consistency at a later date.
Step 8 Pouring, Using & Storing the Salve
Pour the hot salve into clean, dry containers. Notice the cardboard drip tray for easy clean-up!

Let the salve cool completely, preferably overnight, then seal tightly. If salve is not cooled thoroughly, condensation may build inside the container which is not good – remember moisture leads to mould. Here’s the salve before it has cooled.

And here’s what the hardened version looks like.


The salve will be good for 6 months to 1 year. You’ll still be able to use the salve, but the medicinal properties will start to lose their potency and the oil may go rancid.
And that’s it! You should now have 3 cups worth of salve, or 16 1 1/2 ounce jars. What will you do with all those jars of salve? At home, I tuck a jar in every purse and medicine cabinet. There’s also a jar in my back pack, next to our lotions and one next to the sunscreen and bug spray. That leaves a few extra jars for friends and family – stocking stuffers for everyone!
The inspiration and basic technique for making infused oil and salve came from one of my favorite resources on wild food and medicinal plants -– The Boreal Herbal by Beverley Gray. This book may seem pricey at around $50, but you’re really getting at least three books in one – a plant id book, a medicinal remedy book and a cookbook. The information is well researched and easy to understand. (Important Note: I have no ties to this book whatsoever, I just really, really like it and find it incredibly useful.). If you want to explore medicinal plants in more detail, I highly recommend this book.

Have you ever or would you ever make your own salve?
Would you attend a salve making class?
Interested in learning more? Get Getty for a wild edible hike, salve or jam making workshop or group presentation. Getty Stewart is a freelance Professional Home Economist, author of Manitoba’s best-selling Prairie Fruit Cookbook, Founder of Fruit Share, mom and avid veggie gardener. She loves growing, preparing and preserving food and has been doing so forever.