Lemon Ricotta Scones with Cranberries – Perfect for the Holidays
These lemon ricotta scones are so delicious, you’ll want to keep extra unbaked scones ready and waiting in the freezer. Having fresh baked scones first thing in the morning without any of the work or clean-up is something you NEED in your life!😉

Also Read: The Flakiest Savoury Biscuits , Pumpkin Scones with Pepita Topping, Blueberry Lemon Scones with Yogurt
Why Use Ricotta for Scones
I often use buttermilk or yogurt to make biscuits and scones, but I recently discovered delicious creamy ricotta and the benefits of using ricotta for baking.
- Ricotta has a 10 % mf (milk fat) content and fine curd texture, which contributes to a tender, moist crumb. It prevents scones from becoming dry. Lower than cream (30-36%) but higher than yogurt, buttermilk or milk which can vary from 0-9%mf.
- Ricotta has a mild, slightly sweet flavor that pairs beautifully with delicate ingredients like lemon or berries. It enhances these flavors without overpowering them.
- Ricotta’s curds provide structure, preventing the scones from crumbling excessively, which can happen with solely liquid-based options like milk or buttermilk. This structural support is particularly useful for scones with add-ins like fruit or zest.

Tips for Tender Scones
Use Cold Butter
Cold butter holds its shape and takes up space in the dough. When it hits the oven, it melts and creates a tender, flaky pocket inside the scone. That’s what we want!
Pro Tip: Put butter in the freezer for 10-15 minutes before using to ensure it holds its shape while you’re working.
Whether you cut the butter in with a food processor, pastry cutter, two forks, your fingers or a grater – do not overmix. Your goal when mixing in the butter is to create coarse crumbs, about the size of peas.

Avoid Overworking
Stirring or kneading the dough too much will start developing the gluten in the flour, which is great if you’re making bread, not great when making scones. Tender scones need a firm but gentle touch. Just mix the dough enough to form it. It takes practice to get the right balance of kneading the dough enough to hold it together without overworking it. This is the most frustrating part of scone making, but you’ll get it! And trust me, your friends and family will love these scones no matter what.
Embrace Fat
In baking, fat equals tender and tasty. That’s why I like using ricotta in these scones with the butter. Not only does ricotta add a nice flavour, but at 10%MF (milk fat), it provides just the right amount of fat. And those tiny curds that are a natural part of ricotta help create airy texture too.
Keep it Chill
Keep everything nice and cool throughout the entire process to avoid melting the butter and overworking the dough. If you find your dough is getting too sticky place it in the fridge or freezer for a few minutes to chill.
Pro Tip: For light and fluffy scones, place the baking sheet in the freezer for 15-30 minutes before baking.
Avoid Over-flouring
Add as little flour as you can when rolling and shaping your scones. You’ll need some flour to prevent sticking, but keep it minimal. I prefer flouring my countertop, knife and rolling pin rather than the dough itself. If things are getting really sticky, place the dough in the freezer for 5 -10 minutes so it will be easier to work with.
How to Cut and Shape Scones
My two favourite methods of cutting scones are the long brick cut and the round wedge cut. I don’t like using biscuit cutters because I hate washing them and I don’t like having to re-roll the dough which can lead to tough, overworked scones. That’s why I recommend one of the following methods depending on how big you want your pieces.
When you cut small pieces, you get more crispy crusty bites. When you cut big pieces, you get more tender inside bites. Which do you prefer?
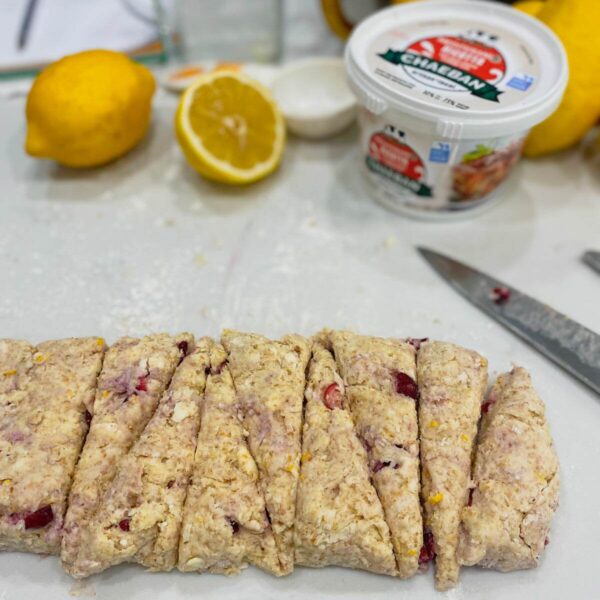
The Long Brick Cut for Shaping Scones
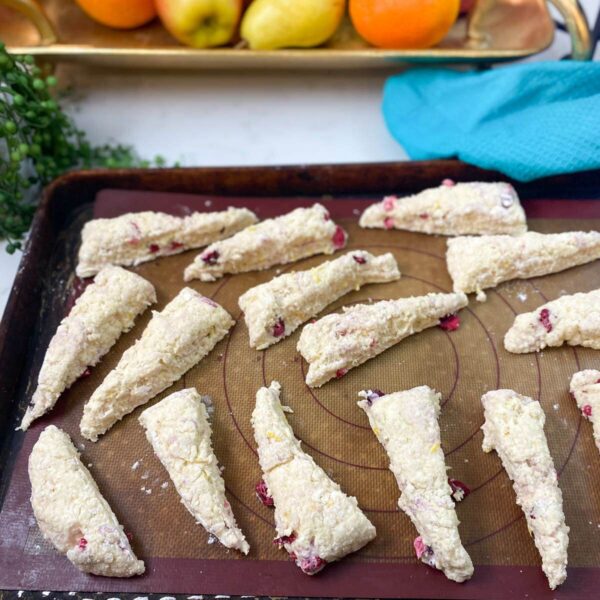
Use your hands to shape the dough into a long rectangle about 16″x3″ (40cmx7cm). Cut the rectangle into 4 equal sized squares, then cut each square in half so you have 8 separate pieces. Finally, cut each of those pieces diagonally to form two triangles. You should have 16 triangular pieces.
The benefit of smaller pieces is getting to enjoy smaller pieces throughout the day and more crispy edges. But smaller pieces are a little more tricky to manage during the cutting process and they may lose their precise shape when baked. Much more rustic looking.
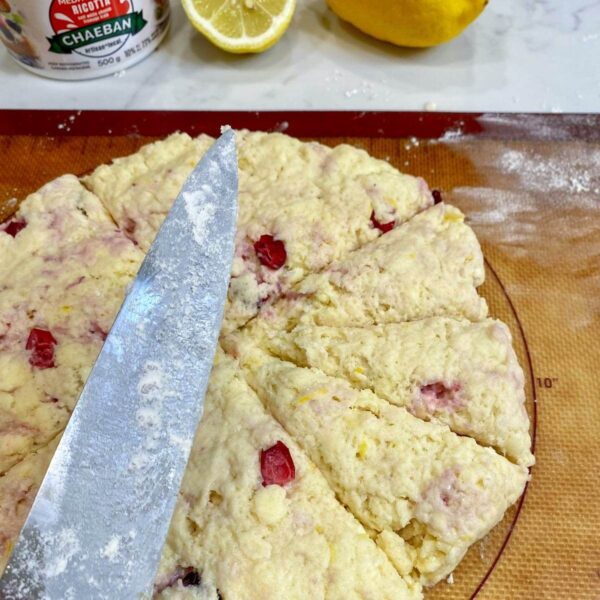
The Round Wedge Cut for Shaping Scones
For bigger pieces, shape the dough into a large round about 1.5″ high and 9″ in diameter. Cut into quarters and then cut each quarter into 2 or 3 pieces to get either 8 or 12 wedges.
Remember to flour your knife when cutting to prevent the dough from sticking. If it is too difficult to move pieces, place in freezer for 10 minutes, trust me it will be much easier!
Gluten Free, Egg Free Modification
To accommodate friends I made a gluten free, egg free version. Here’s what I did and the results were awesome! My GF & EF friend thought they were great and my other friends had no idea they were modified – they just enjoyed the scones!
- Replace 2 cups all purpose flour with 2 cups Bob’s Red Mill 1to1 Gluten free flour.
- Replace 1 egg with 1 flax egg replacement.
- Follow recipe as shown, simply make the substitution
Flax egg – mix 1 Tbsp flax meal with 21/2 Tbsp warm water, stir, let rest 15 minutes.
I chose the flax egg replacement because I felt this recipe needed more binding vs more leavening since there’s already lots of baking powder and baking soda. I’m happy with the results and would do this again.
How to Freeze Lemon Ricotta Scones
You can freeze scones either before or after they’re baked. I prefer to freeze them before baking – you won’t believe how beautifully fluffy and tender they bake from frozen.
Freeze Baked Scones
- Bake as you normally would.
- Cool completely.
- DO NOT add any glaze – do that just before eating.
- Place in airtight container or freezer bag and freeze for up to 3 months for best flavour.
To Reheat: Remove from freezer and let thaw at room temperature. Place in oven or toaster oven at 350°F (180°C) to heat just before serving. Top with glaze as indicated in the original recipe and enjoy.

Freeze Unbaked Scones
My preferred method for freezing scones. Having fresh baked scones in the morning without the fuss or clean up is AMAZING! Perfect for when you’re having guests, visiting a cottage or preparing for a special brunch. Did you know this is how many Bed and Breakfast owners serve their guests fresh baked scones (smell and all)?
- Follow the recipe to make and shape the scones.
- Place the shaped scones on a tray or plate that you can put in the freezer.
- Place the tray in the freezer for 1 hour or until scones are frozen solid.
- Transfer frozen scones into an airtight container or freezer bag. If you wish, you could wrap each one individually, but I usually just put them together in one container, since they’ve been frozen, they stay separated.
- Use the unbaked frozen scones within one month for best flavor and baking results. If frozen too long, they start to lose moisture and may not rise as nicely when baked.
How to Bake Frozen Raw Scones
- Bake directly from frozen, do not thaw. This will produce the best texture.
- Preheat oven to 400°F (204°C).
- Take frozen scones out of the freezer (they’ll thaw just enough by the time the oven is hot).
- Place scones on a lightly greased or parchment lined baking sheet.
- Make sure there is plenty of room between the scones for good air and heat circulation.
- Bake until golden brown and firm about 15-18 minutes. If browning too much, cover with foil in last few minutes.
- Take out of oven and drizzle with glaze as indicated in recipe.
- Enjoy your fresh out of the oven scones!
What Can I Use instead of Ricotta?
If you don’t have ricotta, use these options instead:
- plain thick Greek or Icelandic yogurt – the higher the milk fat content the better, if you use regular plain yogurt, reduce amount to 2/3 cup
- buttermilk (reduce to 1/2 cup) – make your own by adding 1/2 Tbsp lemon juice to measuring cup and adding enough milk to make 1/2 cup – mix and let rest for 10 minutes. Reduce additional lemon juice to 2 Tbsp.
- cream/high fat milk (reduce to 1/2 cup) and reduce lemon juice to 2 Tbsp.
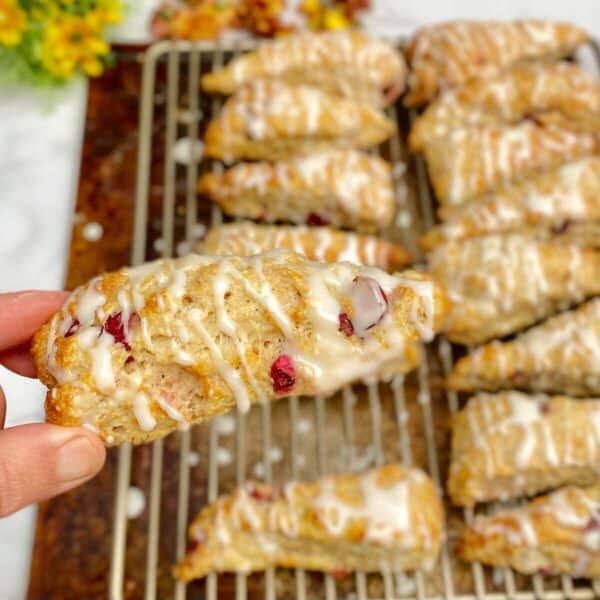
Lemon Ricotta Scones Recipe

Lemon Ricotta Scones with Cranberries
Ingredients
- 2 cups all purpose flour
- 1 Tbsp baking powder
- 1/4 tsp baking soda
- 1/4 tsp salt
- 1/3 cup granulated sugar
- 2 Tbsp lemon zest
- 1/2 cup cold butter diced
- 1 large egg
- 3/4 cup ricotta cheese
- 3 Tbsp lemon juice
- 1 tsp almond extract
- 1/2 cup chopped fresh or frozen cranberries*
Glaze
- 1 cup icing sugar
- 2-3 Tbsp lemon juice
Instructions
- Preheat oven to 400°F (204°C). Lightly grease baking sheet or line with parchment paper or Silpat.
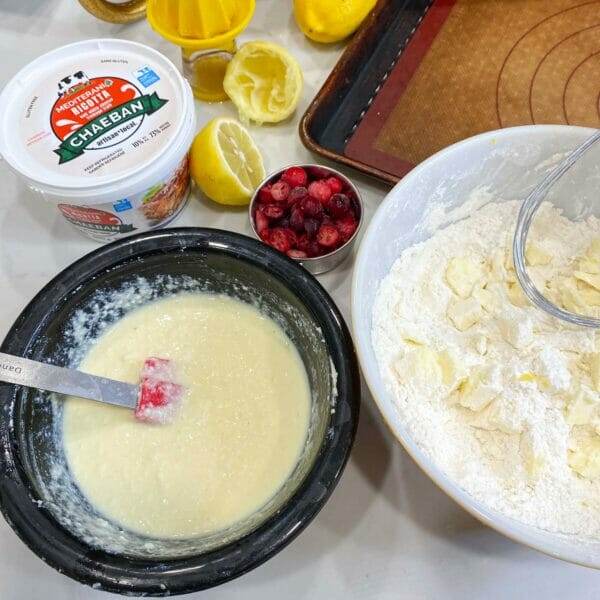
- In large bowl, mix dry ingredients – all purpose flour, baking powder, baking soda, salt, sugar, and lemon zest.
- Using two knives or pastry cutter, cut in butter until well distributed to form small crumbs.
- In small bowl, whisk together wet ingredients – egg, ricotta, lemon juice and extract. Pour into dry ingredients and stir until liquid is mixed in.
- Stir in cranberries and continue to stir until dough starts to come together. There will be some loose crumbs remaining at the bottom.
- Turn dough and crumbs onto a lightly floured surface and use hands to gently knead and work dough to form a ball. If dough is too dry, add an extra splash of milk. If it is too wet, a little flour to counter and top of dough.
- Use your hands to shape the dough into a long rectangle about 16"x3" (40cmx7cm). Cut the rectangle into 4 equal sized squares, then cut each square in half so you have 8 separate pieces. Finally, cut each of those pieces diagonally to form two triangles. You should have 16 triangular pieces.
- Alternative: For bigger pieces, shape the dough into a large round about 1.5" high and 9" in diameter. Cut into 8 or 12 wedges.
- Place on baking sheet leaving space between each scone. Bake for 14-16 minutes until turning golden.
- Remove from oven and place on wire rack to cool.
Glaze
- In small bowl, mix together icing sugar and 2 tablespoons fresh lemon juice. Stir well and gradually add more lemon juice as needed for icing to be smooth and drizzle off the spoon.
- Drizzle or brush over scones. If you want the glaze to melt into the scones, add glaze while scones are hot. If you want an opaque glaze on top of the scones, add the glaze when scones are cool.
- Let rest briefly to let glaze set. Enjoy
Video
Notes
Nutrition Facts (per serving)
Ready to try making your own lemon ricotta scones? Will you add cranberries or another frozen fruit? Let me know how it goes, down below in the comments or on Instagram @GetGettyS or on Facebook @GettyStewart.HomeEconomist.
Cook with the seasons, effortlessly! I’m Getty, a food educator and Professional Home Economist, helping you select, store, and serve seasonal ingredients in delicious, simple, everyday meals. Sign up for seasonal tips and recipes delivered straight to your inbox, and dive deeper with my books, guides, or YouTube content.
First, Thank You for the delicious recipes you share with us. About a month ago, I made cranberry-strawberry sauce, not complicated. Using 2 (12 oz.) bags of fresh cranberries, I added 4 cups of frozen strawberries and followed the standard cranberry sauce recipe. How did I think of this, well, one day I cleaned out my freezer and found a bag of cranberries and a bag of strawberries. Wondered what I was going to do with these two ingredients. Throwing away is not in my character. I thought if tart rhubarb and strawberries can be combined why not combine tart cranberries and strawberries. Family favorite was born. Do you think that it is possible for me to add the cranberry-strawberry sauce to the recipe, make it like a swirl, or would it be a mess?
Opal, I love that cranberry strawberry freezer save. That is exactly how great recipes are born!
Your instincts are right, if you add the sauce directly, you’d likely get a gummy, pink mess. Two options: 1. freeze small spoonfuls of the thick, fully cooled sauce and gently fold them into the dough right at the end – they should stay frozen long enough to shape the dough. 2. Use the sauce as a topping for the scones.
Let me know how it goes. I love this kind of smart, waste nothing kitchen thinking. I puree extra cranberry sauce and use it in fruit roll ups, in BBQ sauce, in my Cinnamon buns (instead of rhubarb), or as a concentrate for beverages – mix with simple syrup and sparkling water.
This is my go-to scone recipe in the winter. Very tender and tasty.
Thanks for the feedback Jen!