How to Cut and Preserve Chives – Freezing and Drying
The best time to cut and preserve chives is in springtime when they are at their peak. Ideally, just before the flowers bloom.
Also Read: Growing Chives, Pruning Chive Blossoms, Chive Blossom Recipes, Chive Recipes
How Do I Know When to Cut and Preserve Chives?
Chives come back year after year and are the first thing to pop up every spring. Within a month, you can harvest and preserve chives. They are at their peak just before the blossoms open up. Here on the prairies, I often harvest my first batch of chives in late May or early June depending on when the snow melts.
Harvesting chives is a lot like cutting your lawn, you can do repeat cuttings – about 3-4 times throughout late spring and early summer. Then, during the heat of summer and after the chives bloom growth will slow. As things cool in the fall, you’ll likely have one more opportunity to harvest chives before the snow and cold set in.
What’s the Best Way to Cut Chives?
There are two ways to cut or harvest chives depending on how you want to use them. If you just need a little bit for a meal, see cutting chives for daily use. If you want to harvest and preserve chives or keep growth at an all time high then see cutting for a big harvest.
Cutting Chives for Daily Use
If you need a small bunch of chives to prepare a meal, only cut what you need and let the rest of the plant continue to grow. You can go back and cut more when you need. You’ll see that the old cuts will send out new shoots fairly quickly.
Cutting for a Big Harvest
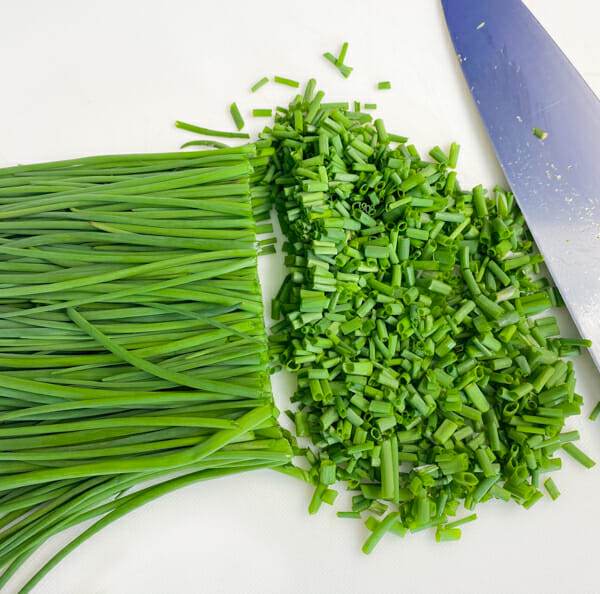
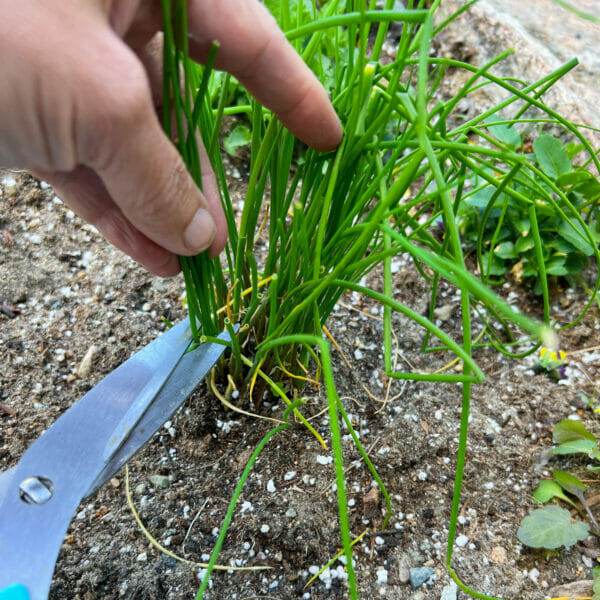
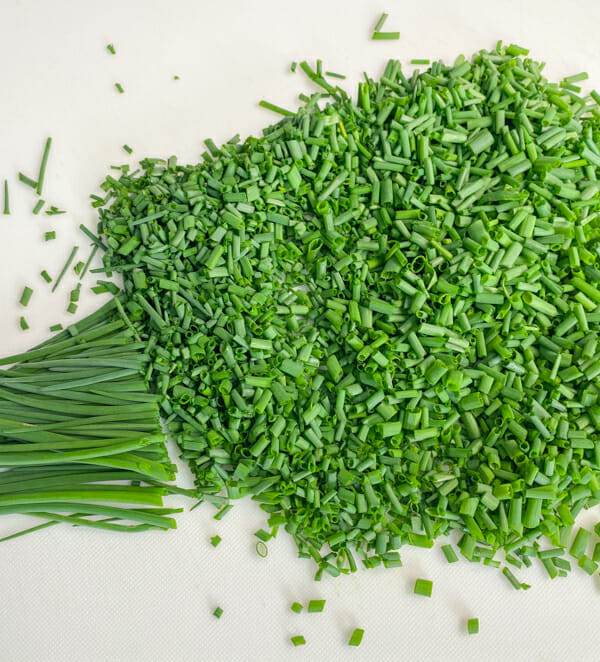
If you use a lot of chives and want to preserve some for future use or you want to promote vigorous growth and extend the season, you can cut back the entire patch. This is like mowing the lawn and looks quite ruthless because you literally cut the entire patch.
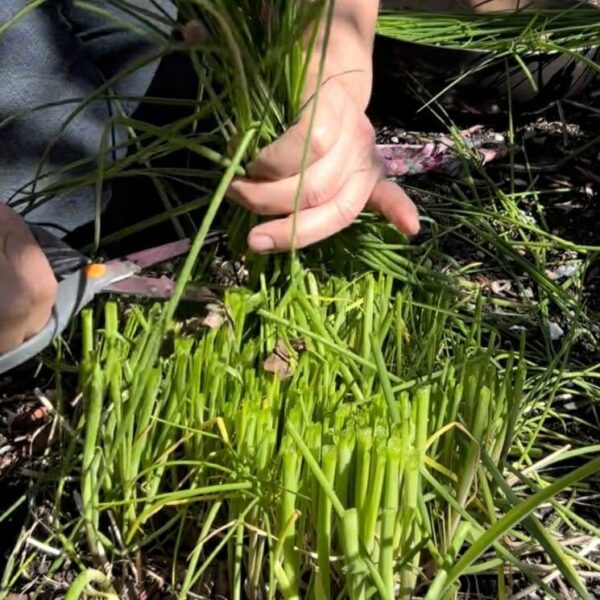
Use kitchen scissors or garden shears to trim the entire patch leaving about 1 to 2 inches (2.5 to 5 cm) above the ground, just like mowing the lawn. Don’t go any lower than that, you don’t want to cut into the root system. Watch the video to see this in action.
Do I have to Cut the Whole Patch?
No, you don’t. Chives are very easy going. If you don’t want to dry or freeze them, you don’t have to cut them down at all. You can happily go along only cutting what you want, when you want. Your chives will be fine.
Just be aware, that chives will slow their growth after they have bloomed and during the heat of the summer. Chives do not like the heat. Expect them to be less fresh and plump during the summer. Cutting the whole batch will help extend the season, but is not necessary. As things cool in the fall, your chives will perk up again and provide you with another opportunity to enjoy fresh, plump chives.
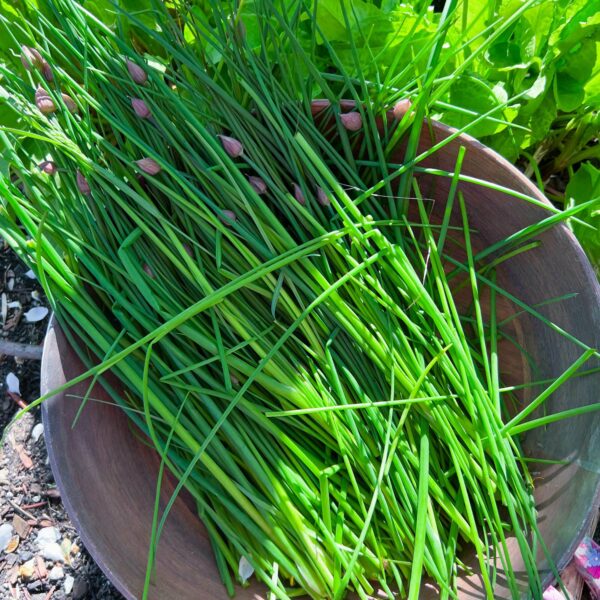
What If I Want to Use The Chive Blossoms?
If you’re eager to make Chive Blossom Biscuits or Chive Blossom Finishing Salt or Infused Vinegar with Chive Blossoms, all of which are AMAZING, wait to trim the whole bunch until you’ve harvested all the blossoms you want. Just don’t wait too long after you pick the blossoms to harvest and preserve the greens because they will start to be less fresh and perky soon after the blossoms fade.

And remember, you’ll definitely want to remove those blossoms once they begin to fade. They produce soooo many seeds – you don’t want them all over your garden. Read How to Prune Chive Blossoms.
What to do with Pests in your Chives
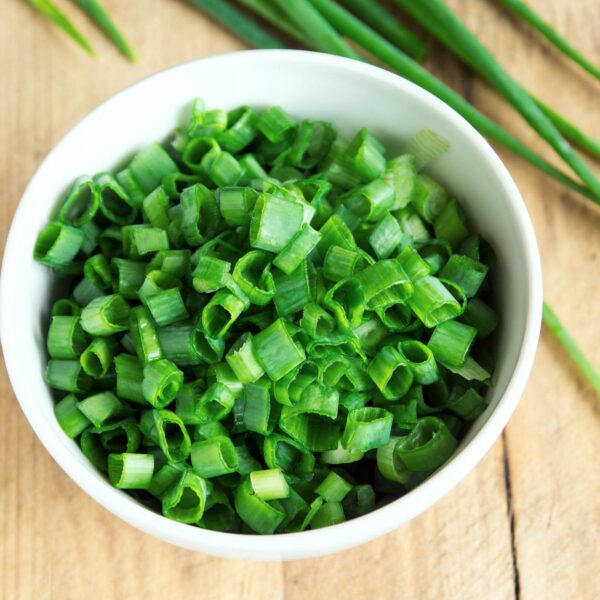
What’s the Best Way to Preserve Chives?
Truth bomb – no matter how you preserve them, chives lose their flavour quite quickly. Personally, I find that freezing chives provides longer flavour than when drying chives, but even then, they’re never as good as fresh.
Drying chives is super easy and it’s nice to be able to sprinkle on some greens to garnish a dish. But expect flavour to decrease at 3 months and be almost gone at 6 months to a year. Anything older than that hardly has any flavour at all.
Freezing chives is also very easy. I find the flavour lasts for 6 months and then starts fading.
Should You Wash Chives Before Drying or Freezing?
You have to decide this for yourself. Here’s what I consider before making the decision:
- Are they from my garden or somewhere else? If they’re from somewhere unknown, I wash them.
- What is my garden like at time of harvest? Is there rain splatter, lots of insects and pests, neighbourhood pets running loose, dust storms, etc. If there’s anything that I think compromises the quality and cleanliness of my chives, I wash them.
- Pretty much the only time I don’t wash them is very early in the spring when they look pristine and no insects have had a chance to settle in.
- If in doubt, wash them!
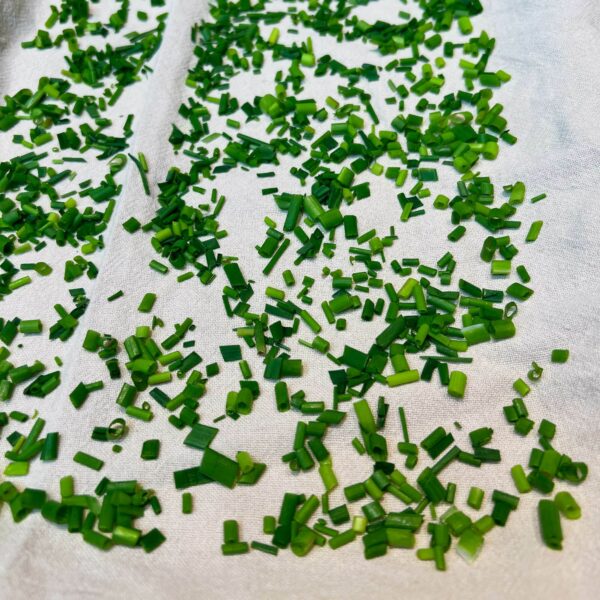
After washing, whether you choose to dry or freeze your chives, pat them dry or put them in a salad spinner to remove as much surface moisture as possible. Water droplets will cause ice crystals and promote freezer burn in frozen chives and will make drying them take longer and increase the risk of mold.
How to Dry Chives
How to Dry Chives
Ingredients
- 1 bunch or patch of Chives
Instructions
Air Dry Chives
- Spread washed, dried and cut chives on a baking sheet or serving tray lined with cloth or paper towel (to soak up any moisture). Make sure it’s a just a single layer of chives so the air can circulate freely.
- Place tray in a dry, warm place with good air circulation out of direct sunlight.
- Within 3-4 days your chives should be dry.
Dry Chives In a Paper Bag
- Wash and dry chives. Place chives in a large paper bag (not plastic) with plenty of room.
- Roll the top of the bag shut. Poke a couple of holes in the bag to allow for air circulation.
- Place in a dry, warm room.
- Check on chives within 2-3 days to ensure they are drying and no mold is forming. This is especially important if you live in a high humid climate or if it’s a really wet/rainy/humid time of year.
- The chives should be dry within 5-7 days.
Dry Chives In the Microwave
- The quickest way to dry chives is in the microwave but it does use a lot of energy.
- Wash, cut and pat dry chives. Place between two paper towels.
- Microwave for 30 seconds at medium to high power. Check on them, remove any that are dried and repeat the cycle until all the chive pieces are brittle and crumbly dry.
- Let cool for 15 minutes before storing in an airtight glass container.
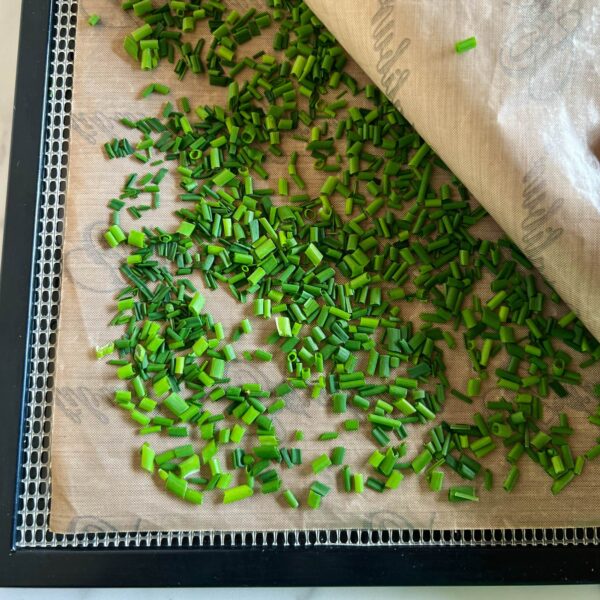
Dry Chives In a Dehydrator
- Drying chives in a dehydrator is similar to Dehydrating Green Onions.
- Wash and pat dry chives. Cut to desired size.
- Line dehydrator tray with Paraflex sheet, silicone or parchment paper. Spread cut chives in even layer on sheet. Cover with a second sheet to prevent them from blowing away once dried.
- Dehydrate at 95-125°F or 35-52°C for 2 to 4 hours. (Use the higher temp if humidity is high).
- Let cool completely, then store in an airtight jar for 3-6 months. Be sure the container doesn’t have too much air space, the chives should fill the container. Store the container in a cool, dry, dark place.
Video
Notes
How to Dry Chives
You can dry chives in a paper bag, on a paper/cloth lined tray, in the microwave or in the dehydrator. I don’t recommend the oven, unless it has a dehydrate setting. Most ovens are just too hot to effectively dry chives. Expect colour and flavour to fade the longer you keep dried chives.
Whatever method you choose, you can dry them whole or cut. If you dry them whole, it may take slightly longer to dry and you’ll need to crumble or cut them once dried. This works fine, but the pieces may be more uneven in size. I prefer cutting them before drying.
Air Dry Chives
Spread washed, dried and cut chives on a baking sheet or serving tray lined with cloth or paper towel (to soak up any moisture). Make sure it’s a just a single layer of chives so the air can circulate freely. Place tray in a dry, warm place with good air circulation out of direct sunlight. Within 3-4 days your chives should be dry.
Dry Chives In a Paper Bag
Wash and dry chives. Place chives in a large paper bag (not plastic) with plenty of room. Roll the top of the bag shut. Poke a couple of holes in the bag to allow for air circulation. Place in a dry, warm room. Check on chives within 2-3 days to ensure they are drying and no mold is forming. This is especially important if you live in a high humid climate or if it’s a really wet/rainy/humid time of year. The chives should be dry within 5-7 days.
Dry Chives In the Microwave
The quickest way to dry chives is in the microwave but it does use a lot of energy.
- Wash, cut and pat dry chives.
- Place between two paper towels.
- Microwave for 30 seconds at medium to high power. Check on them, remove any that are dried and repeat the cycle until all the chive pieces are brittle and crumbly dry.
- Let cool for 15 minutes before storing in an airtight glass container as indicated below.
Dry Chives In a Dehydrator
Drying chives in a dehydrator is similar to Dehydrating Green Onions.
- Wash and pat dry chives.
- Cut to desired size.
- Line dehydrator tray with Paraflex sheet, silicone or parchment paper.
- Spread cut chives in even layer on sheet. Cover with a second sheet to prevent them from blowing away once dried.
- Dehydrate at 95-125°F or 35-52°C for 2 to 4 hours. (Use the higher temp if humidity is high).
- Let cool completely, then store in an airtight jar for 3-6 months. Be sure the container doesn’t have too much air space, the chives should fill the container.
- Store the container in a cool, dry, dark place.
How Do You Store Dried Chives
Store dried chives in an airtight container in a cool, dark place. If you can help it, do not store them next to your stove – it’s too warm and the temperature changes too much. That said, that’s where I keep my every day herbs and spices! But, here’s my secret. I keep little jars in my kitchen, next to the stove where they’re handy. But I store big containers of herbs and spices in my basement where it’s cool and dark. I refill my little kitchen containers as needed. This way, the majority of my herbs and spices are stored in the most effective way possible, while I still have convenient access when cooking. Best of both worlds!

How Long Do Dried Chives Last
You can keep dried chives on your shelf forever – but don’t expect the flavour to stay. Dried chives start losing their flavour within 3 months. You’ll also notice that the colour will start to fade over time.
How to Freeze Chives
Freezing is my preferred method to preserve chives. I find the flavour lasts much longer.

On the internet, you’ll find several different ways to freeze chives. Frankly, most of them are a little overboard for chives. Great methods for some herbs, but really not necessary for chives.
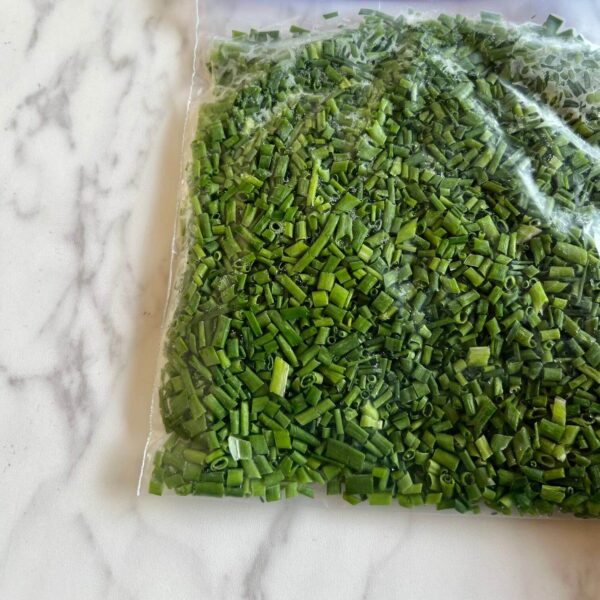
Fast & Easy Way of Freezing Chives
The quickest, easiest way to freeze chives is to chop them and place them in one or two freezer bags. To ensure easy access (not one giant frozen lump), don’t overfill the bag and flatten it out. This way, once the chives are broken, it will be easy to break off a little piece when you need it. It doesn’t get easier than that!
Freezing Chives in Ice Cube Trays
This method works, but it means you can only use your chives in recipes where added water or oil is okay. Great for soups, but not for sprinkling on dishes as a garnish or adding to your favourite dip. To use this method, pack 1/2 to 1 Tbsp cut chives in an ice cube tray and cover with water or oil. Freeze until solid then transfer chive cubes to airtight container.
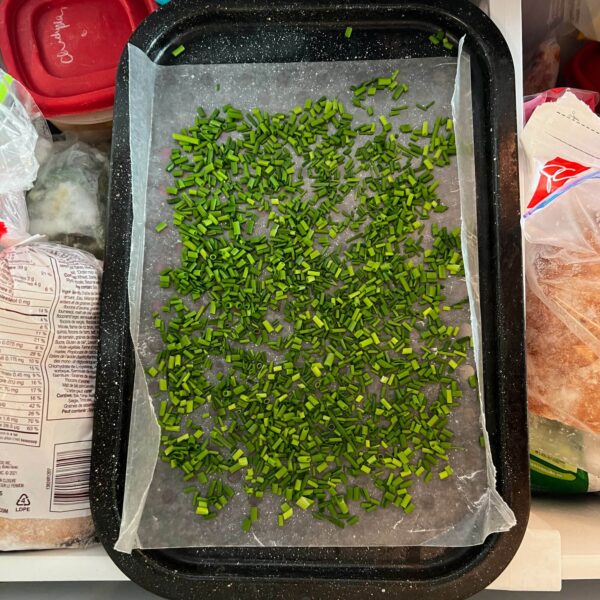
Flash Freezing Chives
For free flowing frozen chives, this is your best option. Ideal if you want to store your frozen chives in a solid container rather than a freezer bag. Cut chives to desired size, place on a parchment or wax paper (prevents them from sticking to the sheet pan) lined baking sheet and freeze for 15 minutes. Once chives are frozen, transfer to an airtight container or freezer bag. To use simply shake out as much or as little as you need.
Freezing Chive Blossoms
Surprise! You can freeze chive blossoms. They freeze surprisingly well and keep their beautiful colour.
I have tried this last year and am so happy with the results, I’ll do it again this year.
- wash chive blossoms in salt water (this helps draw out any pests) ( 2 Tbsp of salt to 4 cups of water)
- dry very well – use a salad spinner and leave on towel for several hours to dry thoroughly
- place whole blossom heads in airtight freezer bag
- freeze for 6 -12 months
- to use, pluck individual blossoms from the heads

How Long Do Frozen Chives Last
Frozen chives will be safe to eat indefinitely as long as they stay frozen. But the flavour and colour will start to deteriorate at about 6 months.
Remember to seal the container or bag well after each use and pop back in the freezer as quick as possible.
Can you do the Same with Garlic Chives?
Yes! Do all the same things with garlic chives. They have very similar growing habits so you can use the same approach. The only difference is that garlic chives will bloom much later in the summer, so there’s no rush to harvest them.

Favourite Ways to Use Chives


What’s your favourite way to preserve chives? Let me know your favorite version and favourite ways to use chives in the comments below or share a photo on Instagram and tag #getgettys so I can see it and like it!

Be confident growing and using herbs.
With NO ads, and all the best tips & recipes in one convenient place! From Garden to Table: Everyday Cooking with Herbs.
65 recipes & preserves + practical tips…
- how to grow herbs
- step-by-step harvesting and preserving instructions
- tantalizing tea and beverage recipes
- mouth watering appetizers, salads, mains, and desserts
- solve all your herb FAQs
Available in ebook and paperback formats.
Cook with the seasons, effortlessly! I’m Getty, a food educator and Professional Home Economist, helping you select, store, and serve seasonal ingredients in delicious, simple, everyday meals. Sign up for seasonal tips and recipes delivered straight to your inbox, and dive deeper with my books, guides, or YouTube content.
Just wondering what the texture of the frozen Chives is when they’re unfrozen. Are they soggy?
Hi, thank you for sharing. I went into the garden and cut some chives this morning. I have been waiting for the flowers to open because I like to put the flowers in soft butter and then put it in the freezer for use in cooking dishes. The flowers have a milder onion flavour that goes well even with eggs. Have you ever taken the green part under the flower (typically harder than the collage without flowers) and dehydrated it and then created a powder with it to make onion powder? I’m going to try it but I’d like to hear from somebody else as well that might have advice.
Hi Sharon,
Thanks for your comments. I like using the chive blossoms too! You can wait to harvest the greens the same day or shortly after you take the blossoms, just don’t wait too long! As for dehydrating, I have not taken the dehydrated the part of the stem/flower you indicated. I have dried the greens and the blossoms. That said, I think it should work no problem. You could even smash those tougher pieces with a meat mallet to help them dry faster. Once thoroughly dry I can’t see why you couldn’t turn them into a powder. You’re going to need quite a few though to make it worthwhile I think. Good luck and let us know how it goes.